
An Exploration of Construction Details, Hardware, and Finishing Methods
Introduction: Similar Appearances, Different Construction Details
When discussing drapery heading styles, we often begin with familiar names: Pinch Pleat, Grommet, Back Tab, Flat Panel, and Rod Pocket.
These terms help us identify the appearance of a curtain and how it is suspended. However, the heading style alone does not tell us everything about how the curtain is made.
Two curtains may look remarkably similar from the front while using different heading stiffeners, hook systems, stitching methods, and back finishes.
Some construction methods are commonly found in traditional custom workrooms, while others are frequently seen in ready-made curtains and online made-to-measure collections. In practice, these approaches often overlap.
The choice is not simply between custom and ready-made. It is also about fabric behavior, design intent, production methods, hardware compatibility, and installation requirements.
This article takes a closer look at several familiar drapery headings through construction illustrations, focusing on the details that are often hidden behind the finished appearance.
For an overview of the different styles themselves, see our Drapery Heading Styles: A Visual Reference Guide.
1. Pinch Pleat: Similar Pleats, Different Hook Systems and Back Finishes
Pinch Pleat is one of the most recognizable heading styles in custom drapery.
The fabric is folded and secured at regular intervals to create structured pleats. Depending on the number of folds, pleat position, and fabrication method, the finished appearance can vary considerably.
Even when two Pinch Pleat curtains look similar from the front, their back construction may be quite different.
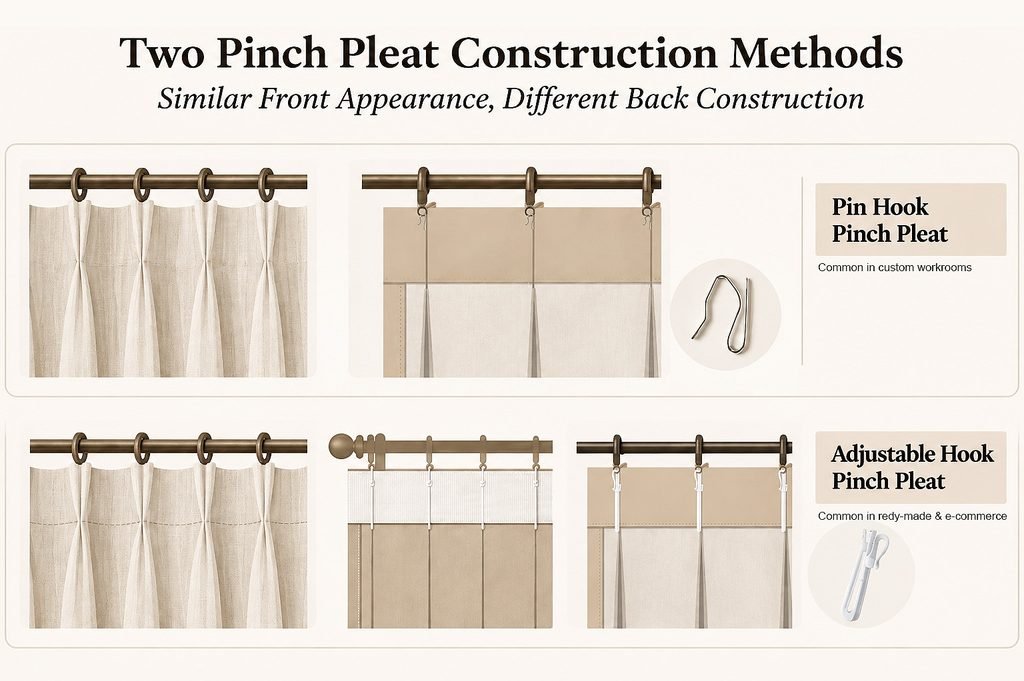
Pin Hooks and Workroom-Style Construction
In many traditional custom workrooms, Pinch Pleat drapery is suspended using metal drapery pins, commonly referred to as Pin Hooks.
Buckram or another heading stiffener is often incorporated into the upper section of the panel to provide support and help maintain the pleat shape.
The fabric may be wrapped around the stiffener before the pleats are formed, creating a clean heading finish.
In some fabrication methods, the front of the heading has no visible horizontal stitching along the lower edge of the stiffener.
This produces an uninterrupted appearance across the flat sections between the pleats.
However, achieving this finish requires careful control of the fabric and stiffener during preparation, pleating, and pressing.
Lightweight or slippery fabrics may require particular attention to prevent shifting or distortion.
Adjustable Hooks and Alternative Heading Construction
Another widely used approach involves Adjustable Hooks.
These hooks allow the hanging position to be adjusted within a limited range, providing flexibility when coordinating the curtain length with the installed hardware.
They are commonly found in standardized curtain systems and online made-to-measure products, although their use is not limited to these applications.
The heading may be constructed with an exposed stiffener or with the stiffener enclosed by the face fabric.
Some methods also use a horizontal row of stitching along the lower edge of the heading stiffener, which may be visible from the front.
An important distinction is that hook selection and heading finishing are separate construction decisions.
An adjustable hook does not necessarily require visible horizontal stitching. Similarly, a pin-hook heading does not always have a concealed or stitch-free front finish.
The illustration presents two commonly encountered combinations rather than two fixed fabrication standards.
For a more detailed comparison of stitching, buckram wrapping, and hook insertion, see Pinch Pleat Heading Finishes.
2. Grommet Headings: More Than a Row of Metal Rings
Grommet curtains use metal eyelets installed through the heading, allowing the curtain rod to pass directly through the panel.
The resulting folds are shaped by the interaction between the fabric, grommet spacing, rod diameter, and fullness.
Although the construction appears straightforward, several details influence the finished result.
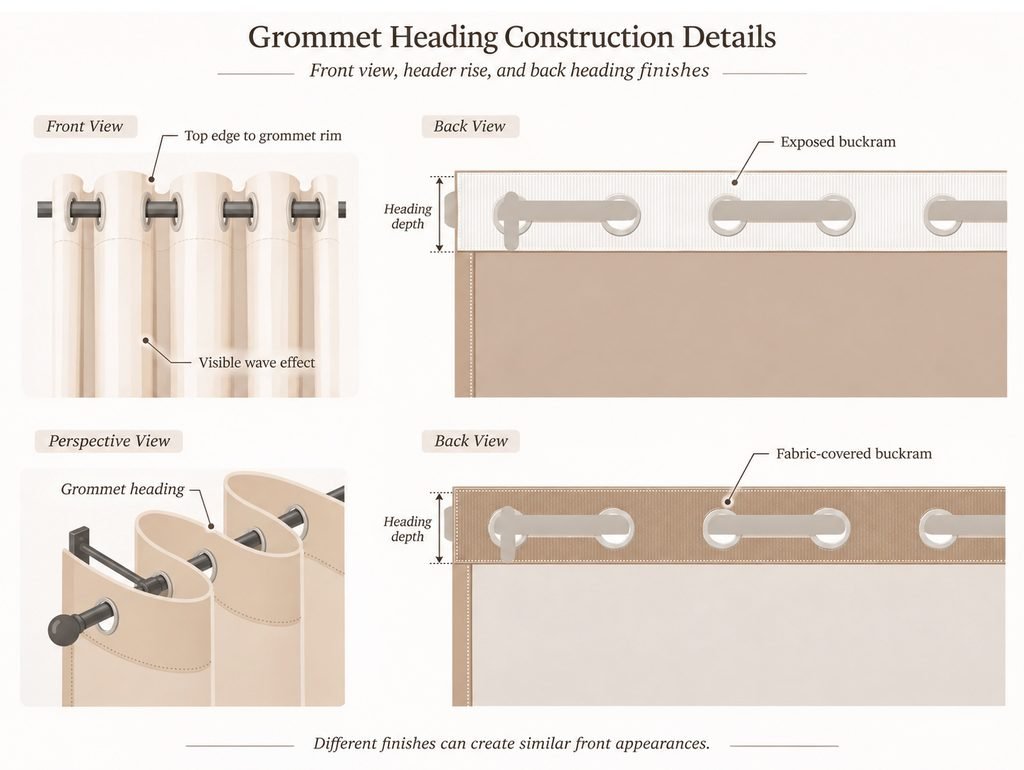
The Distance Above the Grommet
One detail worth examining is the distance between the finished top edge of the curtain and the upper edge of the metal grommet rim.
This measurement affects how much fabric extends above the rod once the curtain is installed.
Different manufacturers and workrooms may use different dimensions depending on the grommet size, rod diameter, and intended appearance.
It is therefore important to distinguish between the top of the finished curtain, the upper edge of the grommet, and the center of the grommet opening.
These are different reference points.
A small change in their relationship may affect both the appearance of the heading and the final installation height.
For more about selecting the correct measurement reference point, see How to Measure for Drapery: From Site Conditions to Finished Dimensions.
Exposed and Fabric-Covered Heading Stiffeners
The back of a Grommet heading may be finished in different ways.
Exposed Heading Stiffener
In this approach, the reinforcing material remains visible on the back of the heading.
Its placement, depth, and stitching may be observed directly.
Fabric-Covered Heading Stiffener
In another approach, the reinforcing material is enclosed within the heading fabric.
The back presents a fabric-finished appearance, with the stiffener concealed inside the construction.
Both approaches can produce a similar front appearance.
The distinction lies primarily in how the reinforcing material is incorporated and how the back of the heading is finished.
Neither method should automatically be associated with a particular price category or product market.
Fullness and the Shape of the Folds
The finished wave pattern of Grommet curtains is influenced by several factors:
- Fabric fullness
- Grommet spacing
- Rod diameter
- Fabric thickness and flexibility
- Available projection and installation space
Greater fullness can create more pronounced folds, but it also increases the depth of the waves and the amount of space required around the rod.
A 2.5× fullness ratio may be selected for a fuller appearance, while other designs may use 2.0× or less.
These are design choices rather than universal rules for custom or ready-made curtains.
The important consideration is how the selected fullness works with the fabric and hardware to achieve the intended result.
3. Back Tab, Flat Panel, and Clip Rings: Different Hanging Methods and Multiway Heading Tape
Unlike Pinch Pleat headings, which rely on individually formed and secured pleats, several other hanging styles begin with a relatively flat panel.
Their finished folds are created primarily through the way the fabric is suspended.
Back Tab, Flat Panel with Hooks, and Clip Rings are useful examples.
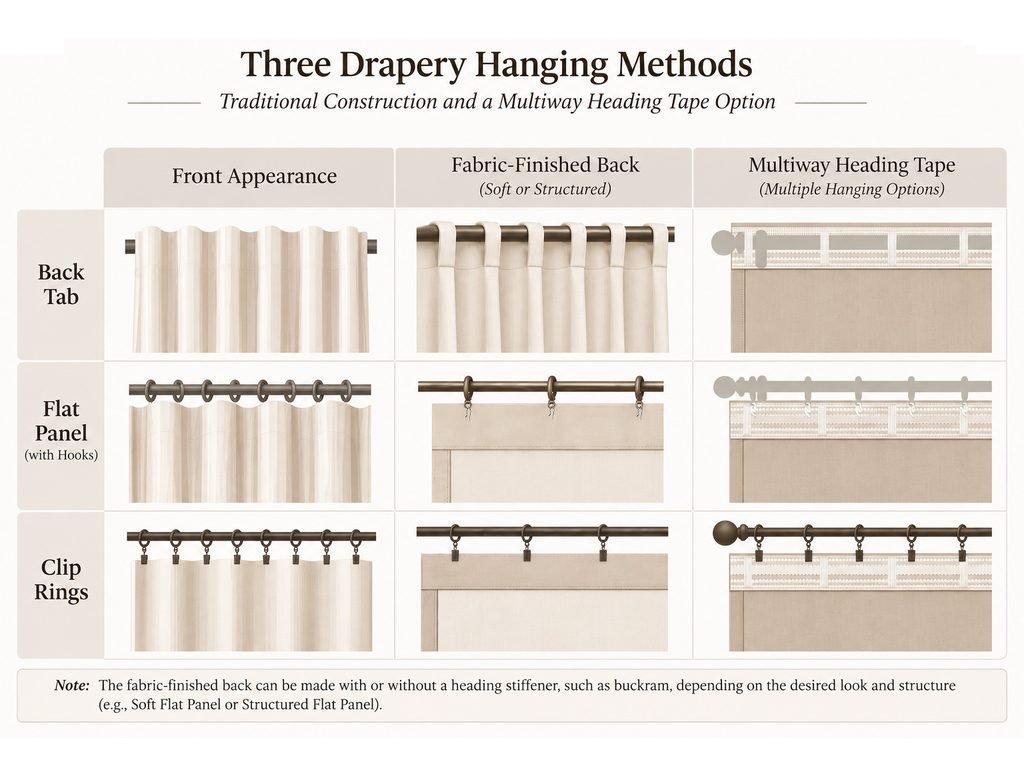
Back Tab: Concealed Fabric Loops
Back Tab curtains use fabric loops attached to the back of the heading.
The rod passes through these loops, leaving the attachment method largely concealed when viewed from the front.
The fabric gathers naturally between the suspension points.
In conventional construction, the tabs are sewn into or onto the finished heading.
Depending on the fabric and desired appearance, the heading may be reinforced or left relatively soft.
The result is a simple hanging method with a clean front appearance.
Flat Panel with Hooks: Structured or Soft
A Flat Panel does not rely on permanently stitched pinch pleats.
Instead, the panel hangs from attachment points such as drapery pins connected to decorative rings or track carriers.
The folds form naturally according to the spacing of these points, the fabric width, and the material’s drape.
Flat Panel headings may be constructed with or without internal stiffening.
A Structured Flat Panel incorporates a heading stiffener to create a firmer, more controlled upper edge.
A Soft Flat Panel relies more directly on the fabric’s natural flexibility and drape.
In both cases, the back may have a clean fabric finish.
A fabric-covered back does not necessarily indicate the absence of a heading stiffener. The reinforcing material may simply be concealed within the finished heading.
This distinction is worth remembering when examining product photographs, as the internal structure cannot always be identified from appearance alone.
Clip Rings: A Direct Attachment Method
Clip Rings provide another simple way to suspend a flat panel.
Small clips attached beneath decorative rings grip the upper edge of the fabric.
Unlike pin-hung panels, this method does not require a heading designed specifically for inserting drapery pins.
The finished appearance depends on the spacing of the clips, the weight of the fabric, and the way the top edge responds to the suspension points.
For lightweight and medium-weight fabrics, this can create a relaxed, informal appearance.
With heavier materials, clip strength and the long-term stability of the attachment become important considerations.
Multiway Heading Tape: Several Hanging Options from One Construction
Many online curtain collections use Multiway Heading Tape, sometimes marketed as 3-in-1 or 4-in-1 heading systems.
These tapes incorporate different channels, loops, pockets, or attachment positions within a single heading structure.
Depending on the product, one curtain may offer several hanging options, such as:
- Hook hanging on decorative rings or tracks
- Back Tab hanging
- Rod Pocket hanging
- Clip Ring hanging
- Gathered or Pencil Pleat effects
The available options depend on the actual tape design. There is no single construction shared by every 3-in-1 or 4-in-1 product.
This approach provides flexibility when a curtain needs to accommodate different hardware arrangements.
It can also simplify product specifications by allowing one heading construction to support more than one installation method.
However, a multiway system does not necessarily reproduce the exact appearance or behavior of a heading specifically constructed for a single hanging method.
The fabric, tape structure, and hardware still determine the final result.
The illustration highlights an important practical distinction: a similar front appearance may be achieved through either a dedicated hanging construction or a multifunctional heading system.
4. Rod Pocket: A Simple Heading with Important Construction Details
Rod Pocket is one of the most straightforward drapery heading constructions.
Instead of using separate tabs, hooks, or grommets, the heading contains a continuous fabric channel through which the curtain rod passes.
The fabric gathers directly along the rod.
Although simple in principle, Rod Pocket headings can be finished in different ways.
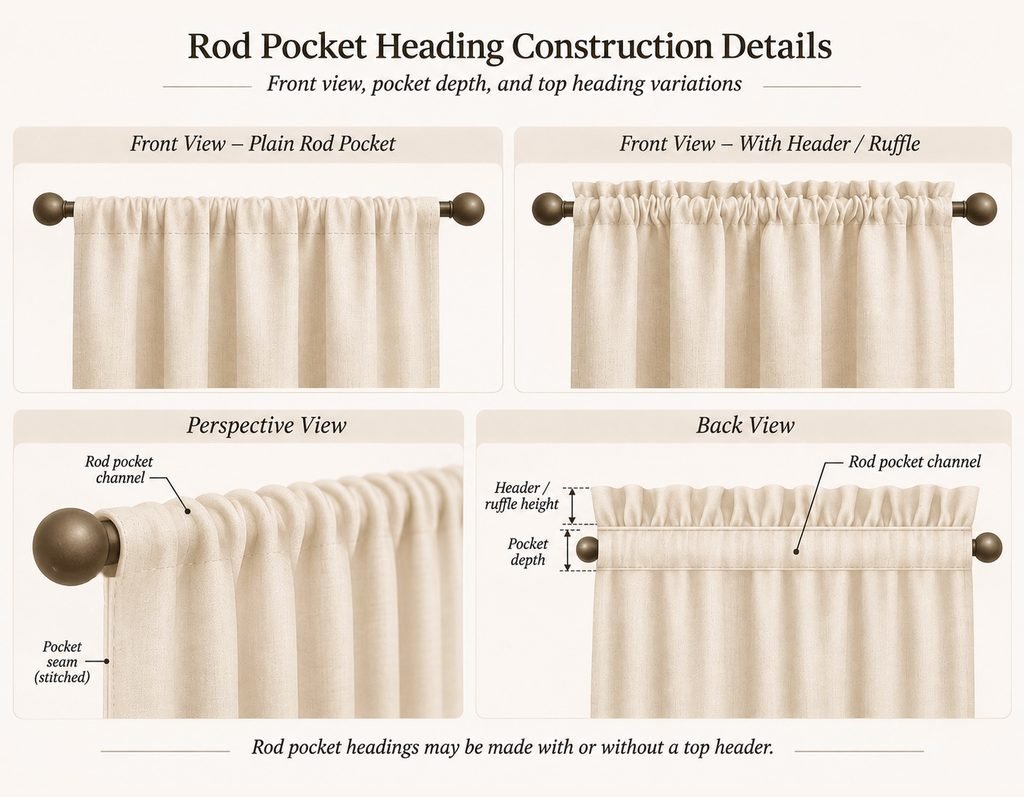
Plain Rod Pocket
A Plain Rod Pocket has no extended decorative header above the rod channel.
The curtain rod passes through the pocket near the finished top edge, allowing the gathered fabric to fall directly below.
The amount of gathering depends on the relationship between the panel width and the rod coverage width.
Fabric thickness and the dimensions of the pocket also affect the resulting folds.
Rod Pocket with a Header or Ruffle
Another variation includes a fabric extension above the rod pocket.
This is often described as a Header, Stand-Up Header, or Ruffle.
Once the curtain is gathered on the rod, the fabric above the pocket forms a decorative upper edge.
The appearance may range from a small, restrained ruffle to a more noticeable gathered detail.
The height of this upper section should be considered separately from the size of the rod channel.
Rod Pocket Size and Fit
The pocket must provide sufficient space for the rod to pass through.
Its dimensions depend on the rod diameter, fabric thickness, and desired gathering effect.
A pocket that is too tight can make installation difficult and restrict movement.
A pocket that is unnecessarily large may affect how closely the fabric follows the rod and how the heading sits.
Rod Pocket construction is often well suited to stationary panels, café curtains, valances, and other treatments that do not require frequent opening and closing.
Even a simple heading benefits from considering the relationship between its internal channel, the fabric, and the intended hardware.
5. What These Construction Differences Tell Us
Looking at these headings together reveals a common pattern.
The front appearance of a curtain is only one part of its construction.
Behind a familiar heading style are decisions about reinforcement, hook placement, stitching, fabric wrapping, hardware connection, and installation.
A custom workroom may adapt these details for a particular fabric or project.
A curtain manufacturer may use repeatable construction specifications that work across a broader product collection.
An online made-to-measure brand may combine customized dimensions with standardized heading systems to simplify ordering and installation.
These approaches are not mutually exclusive.
For example, adjustable hooks provide flexibility in hanging height, while multiway tapes provide flexibility in hardware selection.
A fabric-covered heading may offer a particular back appearance, while an exposed stiffener may provide a straightforward way to assemble and inspect the construction.
Each method responds to practical requirements.
The real question is not whether one method is inherently better than another.
It is whether the chosen construction works appropriately with the fabric, heading style, hardware, and intended use.
Conclusion: Looking Beyond the Heading Style
Learning the names of drapery heading styles is a useful starting point.
Understanding how they are constructed adds another layer of knowledge.
Two Pinch Pleat curtains may use different hook systems and heading finishes.
Two Grommet curtains may have different stiffener treatments and grommet positions.
Back Tab, Flat Panel, and Clip Ring styles may be produced through dedicated constructions or multifunctional heading tapes.
Even a simple Rod Pocket requires decisions about channel size, gathering, and the optional upper header.
These details may be hidden behind the finished curtain, but they influence how the product is made, installed, and used.
The purpose of examining them is not to rank different fabrication methods.
It is to better understand the choices behind them.
A well-considered drapery heading is not defined only by how it looks from the front, but also by how its construction supports the intended design and function.