
Measuring for custom drapery is not simply a matter of recording the width and height of a window.
A complete measurement process also considers the surrounding wall space, the intended function of the drapery, the hardware position, the amount of space needed for the panels to stack, and where the finished drapery is meant to end.
The same window may require very different dimensions depending on whether the treatment is stationary or functional, which hardware system is used, and how the finished panels are intended to operate.
For that reason, drapery measurement is better understood as a sequence:
architecture → design intent → hardware position → finished dimensions
1. Measure the Window Itself
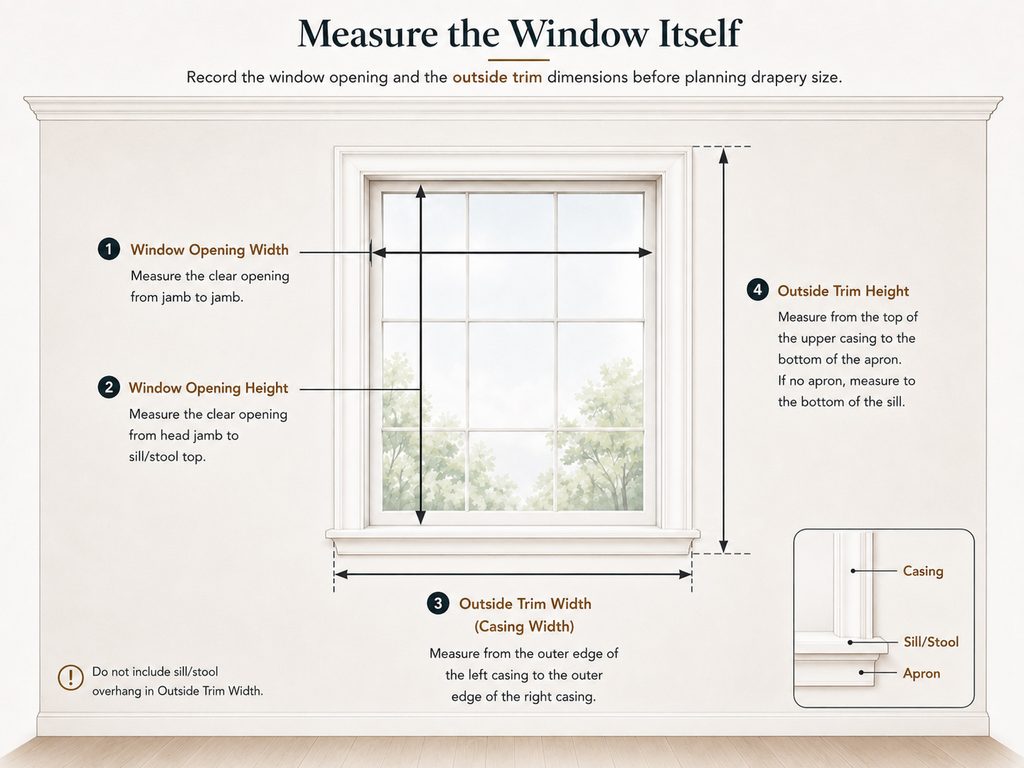
Before planning the drapery, begin with the basic architectural dimensions of the window.
Typical measurements include:
- Window Opening Width
- Window Opening Height
- Outside Trim Width
- Outside Trim Height
The window opening refers to the clear opening itself, while the outside trim measurement includes the surrounding casing.
These dimensions do not directly determine the finished drapery width. Instead, they provide the reference points needed to evaluate hardware placement, coverage, proportion, and available extension beyond the opening.
If the window includes a sill or stool and an apron, note their position and overall projection as separate architectural elements. The projecting ends of a sill should not automatically be treated as part of the casing width.
For windows without a sill or apron, record the actual opening and casing dimensions as they are built.
2. Measure the Surrounding Space
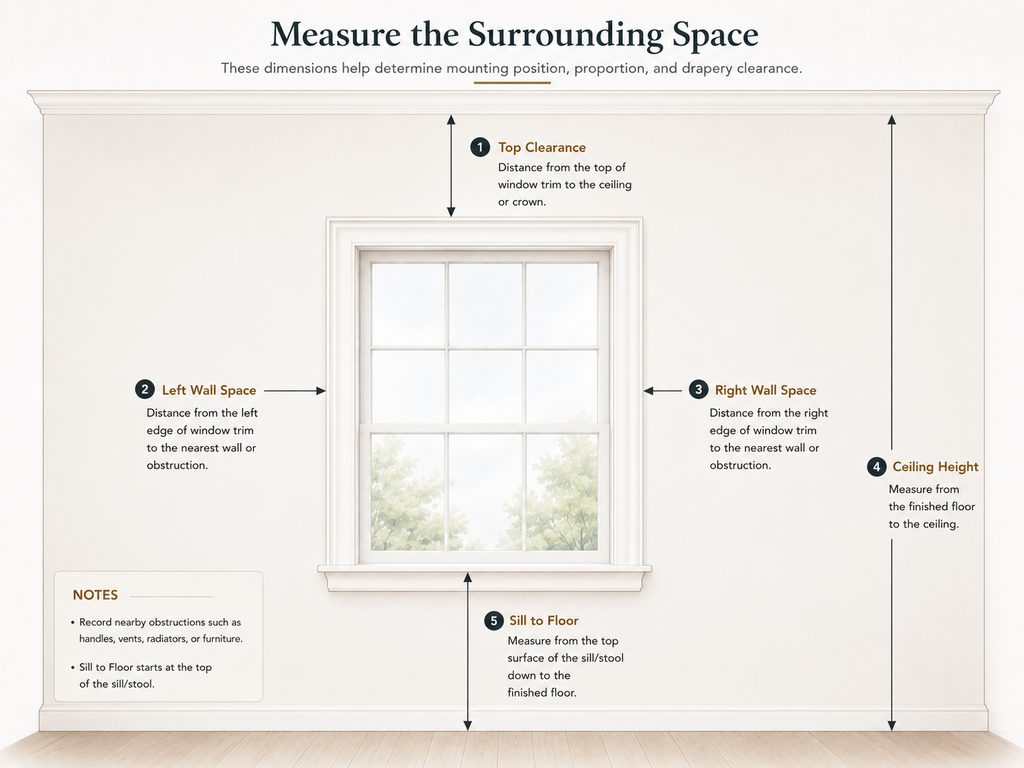
The window itself is only the starting point.
Custom drapery is often installed beyond the opening, so the surrounding architecture can be just as important as the window dimensions.
Useful measurements include:
- the distance from the top of the trim to the ceiling or crown molding
- the available wall space to the left and right of the window
- ceiling height
- the distance from the sill or stool to the finished floor
These conditions can influence:
- how high the rod or track can be installed
- how far the hardware can extend beyond the opening
- whether there is enough space for stack back
- how the finished drapery length is determined
At this stage, the goal is not to finalize the drapery size. It is to create a clear record of the site conditions that will affect the design and installation.
3. Decide Whether the Drapery Is Stationary or Functional
Before determining rod width, first decide how the drapery is intended to function.
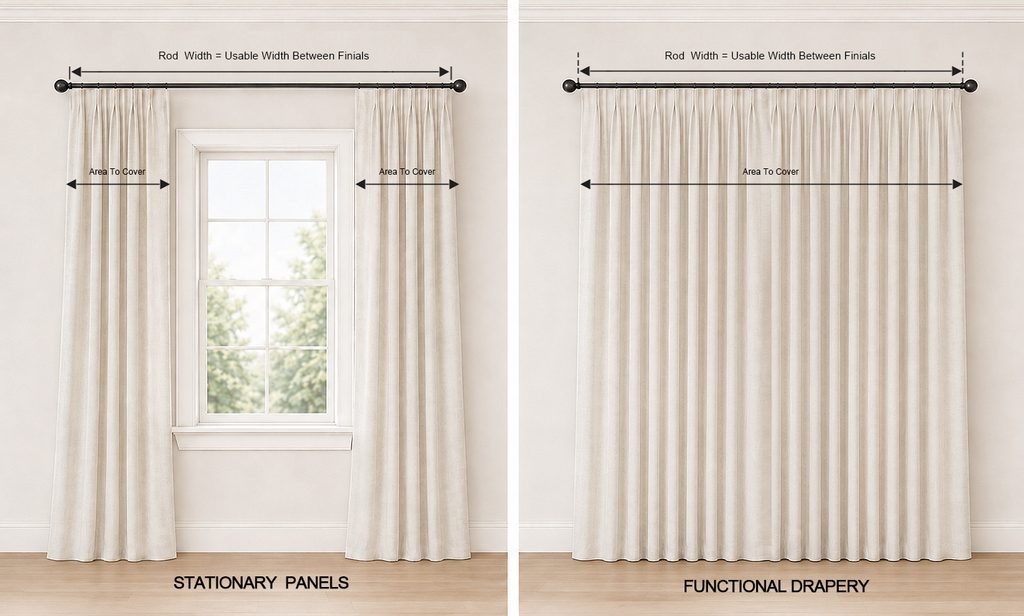
Stationary Panels
Stationary panels are primarily decorative. They frame the window, soften the architecture, and help establish proportion within the room.
Because they are not intended to close across the opening:
Rod Width and Area to Cover are not necessarily the same.
The rod may span the full window or extend beyond it, while the actual fabric coverage may be limited to the decorative areas at the sides.
Functional Drapery
Functional drapery is designed to open and close for purposes such as:
- privacy
- light control
- insulation
- full window coverage
In this case, the closed panels need to cover the full working area.
This is why the drapery function should be established before the rod width and coverage are finalized.
4. Determine Rod Width, Area to Cover, Draw Direction, and Stack Location
For a decorative rod, Rod Width in this guide refers to the usable rod span between the finials.
The finials are not included in that working width, but they still require additional wall space and should be considered during installation planning.
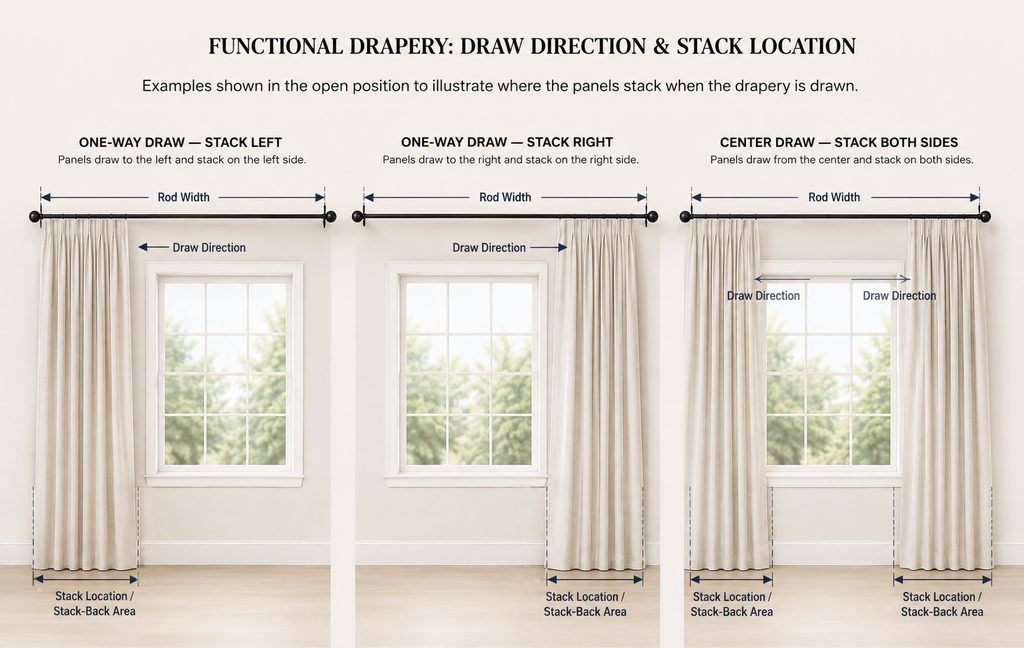
For functional drapery, the next step is to determine how the panels will open:
- One-Way Draw — Stack Left
- One-Way Draw — Stack Right
- Center Draw — Stack Both Sides
The draw direction determines where the fabric will collect when the drapery is open.
If the design goal is to expose as much glass as possible, additional space may be needed beyond the opening so the panels can stack away from the glass.
There is no single stack-back formula that applies to every drapery.
The required space may vary with:
- heading style
- fullness
- fabric thickness
- lining
- pleat spacing
- hardware system
Stack back is therefore best treated as a design and system consideration rather than a fixed percentage.
5. Determine the Finished Drapery Length — Starting Point
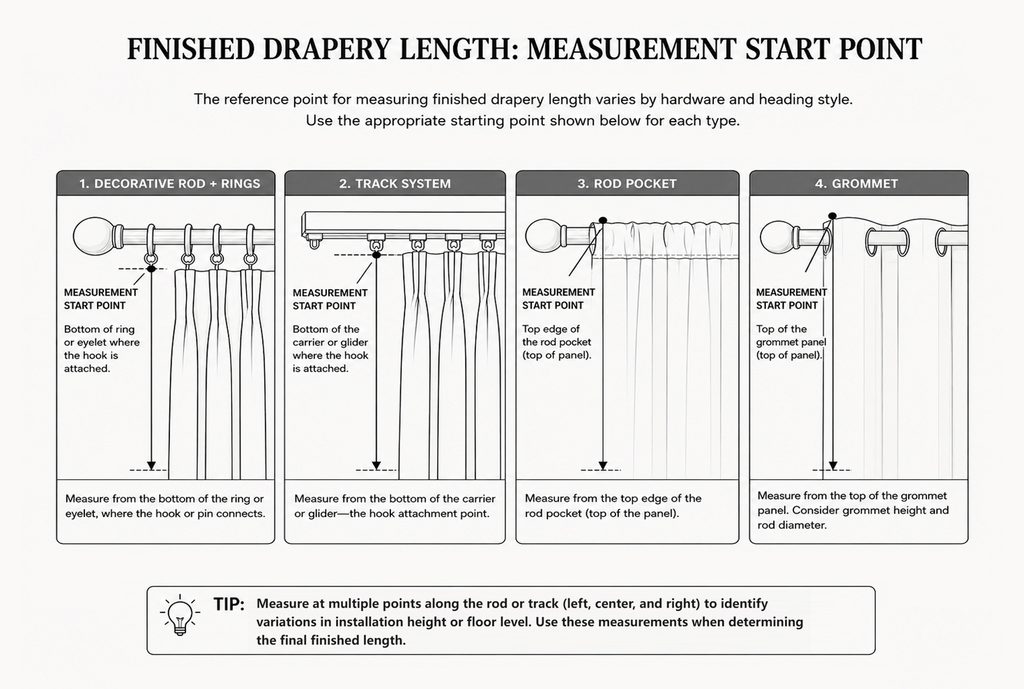
The starting point for finished drapery length is not the same for every treatment.
Different hardware systems and heading styles use different reference points.
Finished drapery length and hardware mounting height are also closely related.
If the hardware is already installed, the finished length can be measured from the appropriate reference point down to the desired finished end point.
If the hardware has not yet been installed, the same relationship can be used in reverse: the desired finished length and heading construction can help establish the correct mounting height for the rod or track.
Decorative Rod + Rings
Measure from the ring or eyelet connection point where the drapery hook or pin is attached.
Track System
Measure from the carrier or glider attachment point.
Rod Pocket
Finished panel length is referenced from the top of the panel, including the top of the rod-pocket heading.
Grommet
The finished panel is also referenced from the top of the panel.
Tab Top
Tab-top drapery is generally referenced from the top of the finished panel as well.
Because the tabs extend above the panel and wrap around or hang from the decorative rod, the tab length affects the final position of the panel top relative to the rod. That relationship should be considered when establishing either the finished length or the rod mounting height.
The examples shown here represent common reference conditions rather than every possible heading style.
For example, ripple-fold drapery installed on a track follows the track carrier or attachment-point logic. Other pleated headings installed on rings or track carriers generally follow the reference point established by that hardware system.
The important question is not simply:
What is the heading called?
It is:
From which reference point is the finished panel length defined?
It is also useful to record measurements at several points—such as left, center, and right—to identify variations in installation height or floor level before the final finished length is confirmed.
6. Choose the Finished Drapery Length Option
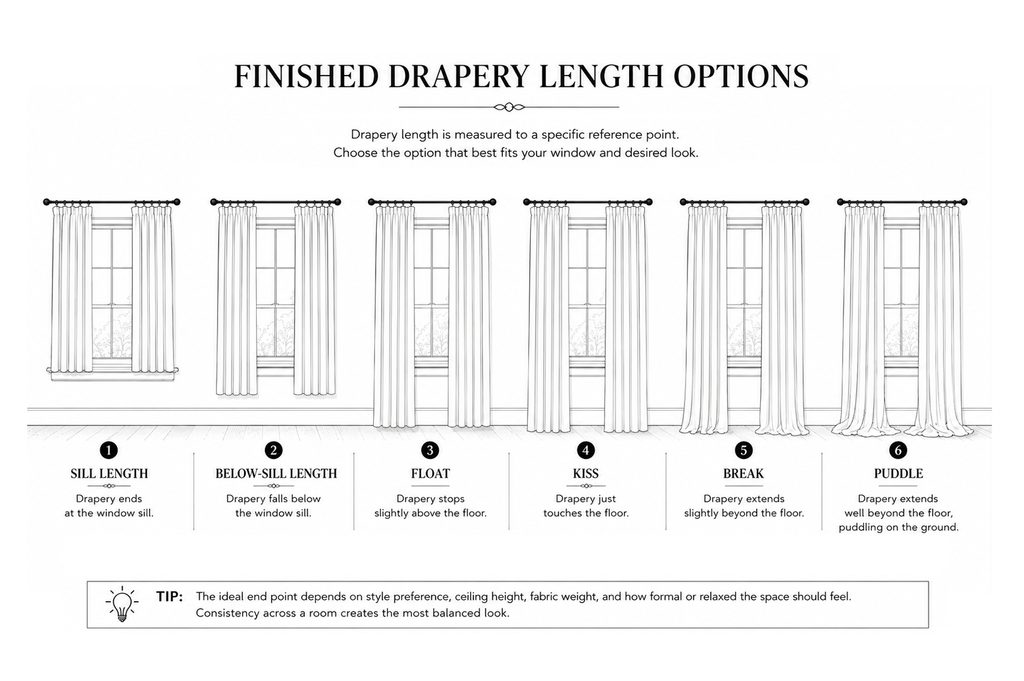
Once the starting reference point has been established, the next decision is where the drapery should end.
The finished end point is both a measurement decision and a design decision.
Common finished-length relationships include:
- Sill Length
- Below-Sill Length
- Float
- Kiss
- Break
- Puddle
Sill Length
The drapery ends at or near the sill.
This is typically used where a full floor-length treatment is not required. The exact end point should be coordinated with the sill or stool construction and the way the window operates.
Below-Sill Length
The drapery extends below the sill but stops before reaching the floor.
Nearby trim, apron details, furniture, and wall conditions may all affect where this length should end.
Float
The lower edge of the drapery stops slightly above the floor.
This approach is often practical for functional drapery that is opened and closed regularly or where minimizing contact with the floor is preferred.
The exact clearance should be determined by the project rather than treated as a universal number. Consider:
- floor condition
- installation tolerance
- fabric behavior
- intended appearance
Kiss
The hem just touches the floor.
This effect requires more precise measuring and installation because small variations in floor level or hardware height are more visible.
For this reason, multiple site measurements are especially useful when a true kiss is the goal.
Break
The drapery extends slightly beyond the floor, allowing the lower edge to form a soft natural break.
Compared with a kiss, a slight break can be somewhat more forgiving of minor height variations, but the additional length is still a design choice rather than a fixed allowance.
Puddle
The drapery extends noticeably beyond the floor and pools intentionally.
This effect requires additional finished length beyond the basic floor measurement.
The amount depends on the desired look, the fabric, and how the room is used.
A puddle should therefore be treated as an intentional design decision, not simply as “measuring to the floor.”
Choose the End Point Before Confirming the Final Length
Regardless of the selected style, the basic principle is the same:
Determine the desired end point first, then confirm the Finished Drapery Length.
The finished length is defined by two references:
Correct Starting Reference Point + Desired Finished End Point
The first is determined by the hardware and heading construction. The second is determined by the design intent and site conditions.
7. Final Site Conditions to Check
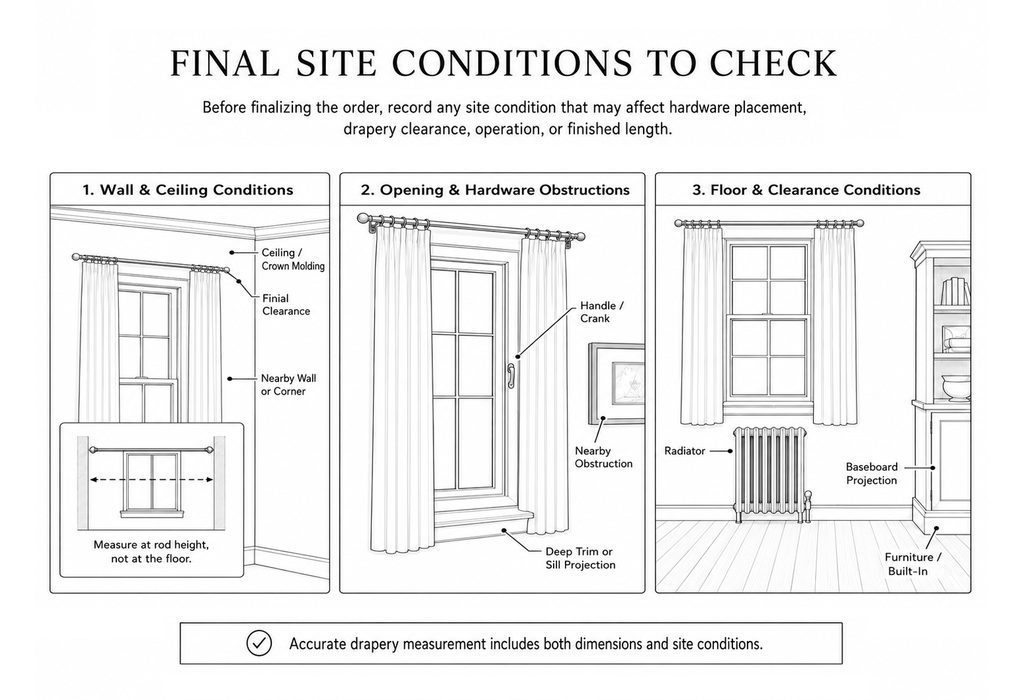
Once the main measurements have been established, review the surrounding conditions before the order is finalized.
Wall and Ceiling Conditions
Check:
- ceiling condition
- crown molding
- nearby walls or corners
- finial clearance
For wall-to-wall or near wall-to-wall installations, measure the width at the actual rod or track height rather than relying on the wall width at floor level.
Walls are not always perfectly vertical, and the usable width can vary from one height to another.
Opening and Hardware Obstructions
Check:
- window handles or cranks
- deep casing
- deep sills
- nearby obstructions
Deep trim or sill projections may affect bracket projection and the distance between the drapery and the wall.
Floor and Clearance Conditions
Check:
- radiators
- baseboard projection
- furniture
- built-in cabinetry
These conditions may affect drapery clearance, panel drop, operation, or final hardware placement.
Accurate drapery measurement includes both dimensions and site conditions.
8. Final Measurement Review
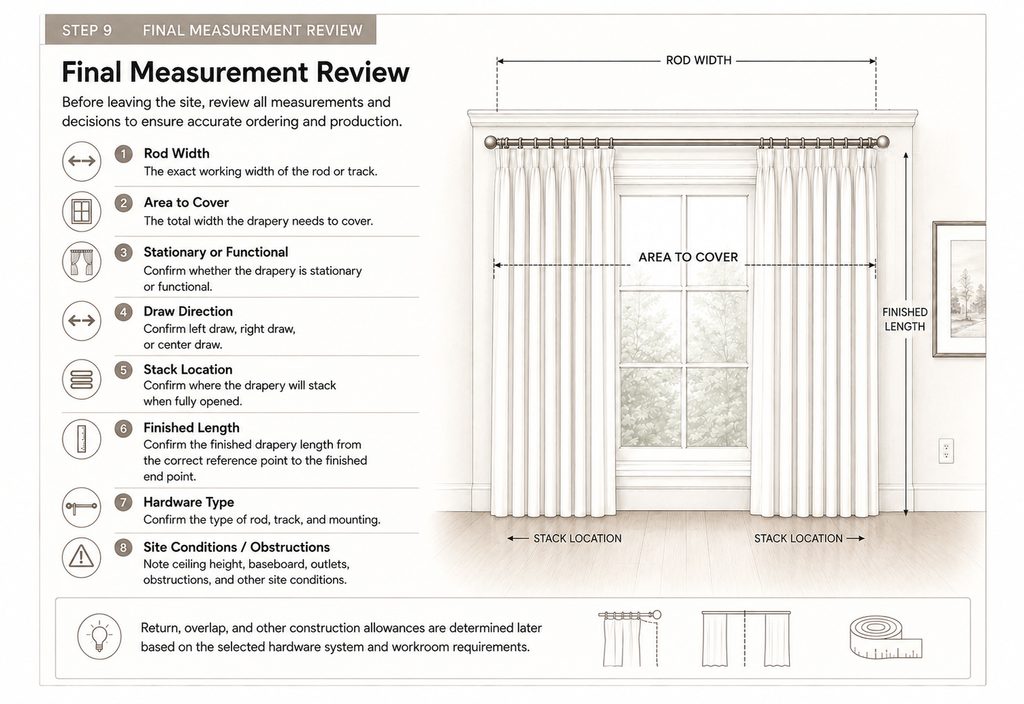
Before leaving the site or moving into ordering and fabrication, review the key information one more time:
- Rod Width
- Area to Cover
- Stationary or Functional
- Draw Direction
- Stack Location
- Finished Length
- Hardware Type
- Site Conditions / Obstructions
Finished length should always be confirmed:
from the correct reference point to the desired finished end point
rather than from the top of the rod, ceiling, or another assumed universal starting point.
The hardware system should also be confirmed, because later fabrication details may depend on the selected system.
Measurement and Construction Are Two Different Stages
It is useful to keep site measurement and fabrication calculation separate.
The site-measurement stage is primarily used to establish:
- architectural dimensions
- hardware placement
- coverage
- stack location
- finished length
- site conditions
Details such as:
- return
- overlap
- leading edge
- side edge
- other fabrication allowances
are typically determined later, once the hardware system and workroom construction requirements are known.
These allowances should not be treated as fixed site-measurement values.
Final Thoughts
Accurate drapery measurement is not a matter of taking one window width and turning it into one curtain size.
It is a sequence of decisions.
First understand the architecture. Then define the function and design intent. From there, determine the hardware position, coverage, stack location, and finished length.
Once those relationships are clearly recorded, the workroom has a much more reliable basis for calculating fullness, returns, overlap, and the other construction details that follow.
A good drapery measurement is therefore more than a set of dimensions.
It is a clear record of how the architecture, hardware, design, and finished treatment are intended to work together.
Related Articles
- Custom Window Treatment Measuring Basics— a broader introduction to window treatment measurement
- Understanding Drapery Stack Back— factors that affect how much space drapery occupies when open
- Drapery Length, Coverage, and Layering: A Visual Guide — a visual reference for finished length and coverage
- Drapery Heading Styles: A Visual Reference Guide — common heading styles and how they affect drapery appearance
Comments are closed.