
Measuring is one of the most important steps in custom window treatments.
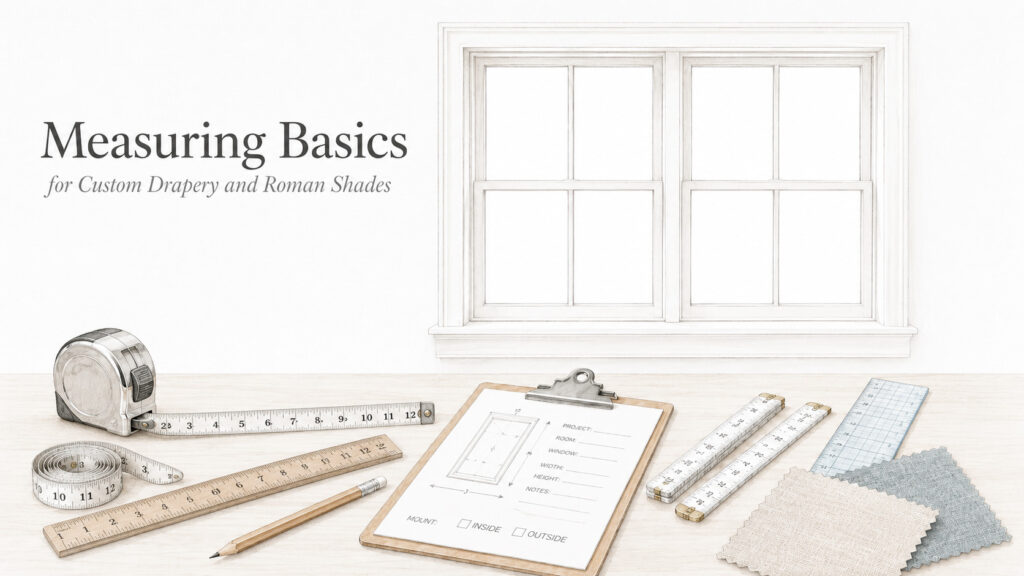
A beautiful fabric or a well-designed style can still fail if the measuring logic is unclear. A drapery may not cover the intended area properly. A Roman shade may look out of proportion after installation. The finished size may also be different from what the client, designer, or workroom originally understood.
Measuring is not only about recording width and length. It is about understanding what the treatment needs to cover, where it will be installed, how it will operate, and how the finished piece should relate to the window, wall, floor, and hardware.
This article is not a complete measuring manual. It is a basic reference for understanding the measuring concepts commonly used in custom drapery and Roman shades.
Why Measuring Logic Matters
In custom window treatments, measuring is not simply writing down the window width and height.
A good measuring process should help answer several important questions.
- What area should the treatment cover?
- Where will the hardware be installed?
- Will the product be inside mount or outside mount?
- Does the treatment need returns, overlap, or extra coverage?
- How much stackback space is needed when the drapery is open?
- Should a Roman shade clear more glass when it is raised?
- Has the finished size been clearly distinguished from the area to cover?
If these questions are not answered during the measuring stage, misunderstandings can easily appear later during fabrication or installation.
Area to Cover
Area to cover refers to the area the window treatment is intended to cover.
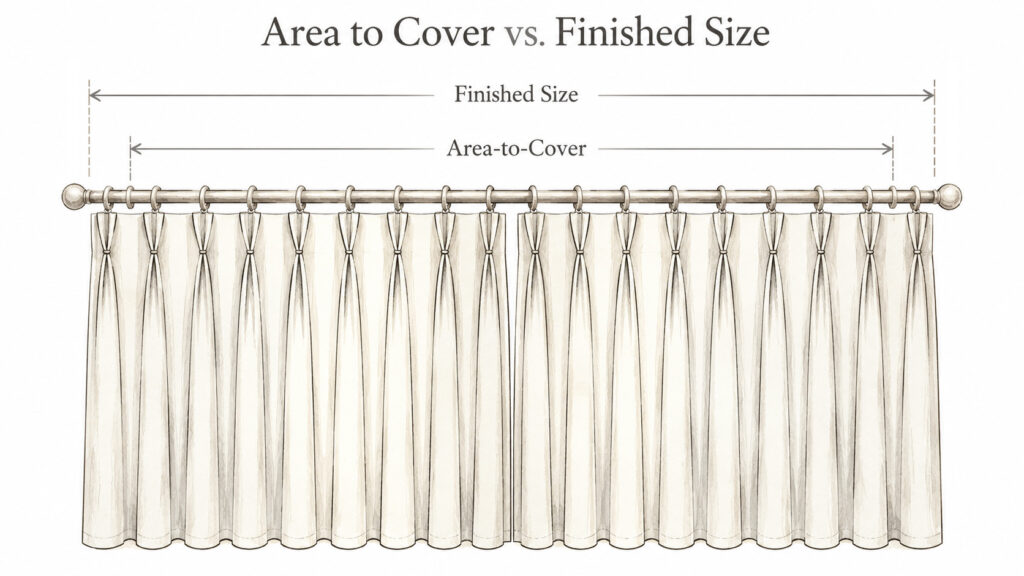
It may be the glass area, the window frame, the full opening, or a larger wall area around the window. The correct area depends on the design goal, light control needs, mounting method, and desired visual proportion.
Area to cover is often the starting point for custom window treatment planning.
However, it is not always the same as the finished product size.
For example, a functional drapery may need returns and overlap in addition to the basic area to cover. An outside mount Roman shade may need extra coverage above and beyond the opening to reduce light gaps and improve proportion. A drapery that is intended to clear more glass when open may also need additional stackback space.
For this reason, it is important to clarify whether a measurement refers to the area to cover or the finished size of the treatment.
Finished Width
Finished width is the actual completed width of the treatment after fabrication.
For drapery, finished width may include returns, overlap, or other allowances related to the hardware and application. Whether these allowances are included should be clearly defined by the order standard or project specification.
For Roman shades, finished width usually refers to the actual completed shade width. This is especially important for inside mount applications, where the size must be very precise.
One of the most common sources of confusion in custom work is using window width, area to cover, and finished width as if they mean the same thing.
They are related, but they are not the same.
Window width is the size of the window itself.
Area to cover is the area the treatment is intended to cover.
Finished width is the final width of the completed product.
When these terms are clearly separated, communication between the designer, client, workroom, and installer becomes much more accurate.
Finished Length
Finished length is the completed vertical length of the treatment.
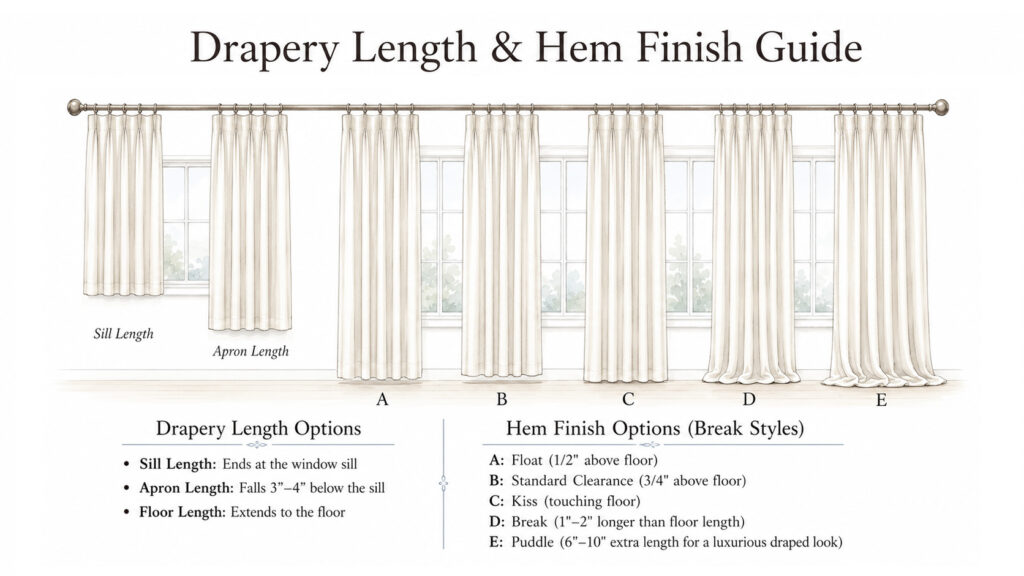
For drapery, the starting point for measuring finished length depends on the hardware type. A drapery may be measured from the rod, ring, hook position, bottom of the track, or another specified point to the finished hem position.
The finished length should also be connected to the desired bottom finish. The drapery may float above the floor, touch the floor, break slightly, or puddle depending on the design intention.
For Roman shades, finished length usually refers to the completed height from the top of the shade or headrail to the bottom of the shade.
For both drapery and Roman shades, finished length should always be considered together with the mounting method and the desired bottom position.
Inside Mount
Inside mount means the treatment is installed inside the window opening or frame.
This mounting method often creates a clean and tailored look, especially for Roman shades. An inside mount Roman shade can keep the window frame visible and make the treatment feel closely integrated with the architecture.
However, inside mount requires more precise measuring.
The opening must have enough mounting depth. It should also be reasonably square. If the opening varies significantly from top to bottom or side to side, the finished treatment may show uneven side gaps, operate less smoothly, or look visually unbalanced.
For inside mount applications, width is usually measured at several points, such as the top, middle, and bottom of the opening. Height may also be measured at the left, center, and right.
Because many window openings are not perfectly square, the narrowest width is often the most important reference for an inside mount product.
Outside Mount
Outside mount means the treatment is installed outside the window opening, usually on the wall, trim, or above the opening.
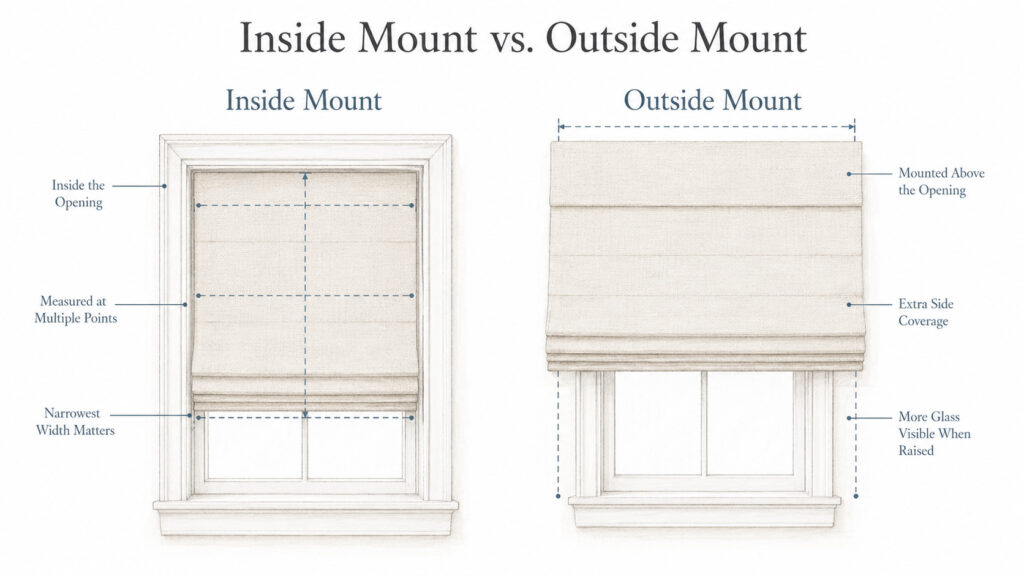
Outside mount allows more flexibility in proportion and often improves light control.
For Roman shades, an outside mount can allow the shade to stack above the opening when raised, leaving more glass visible and making the window feel taller and more open.
For drapery, outside mount is very common. Hardware can be installed higher and wider than the window, helping improve the room proportion and allowing the drapery panels to stack more fully off the glass.
For outside mount applications, the measuring plan should define how much extra coverage is needed above, below, and on each side of the opening.
This extra coverage should not be random. It should be based on light control, proportion, hardware, wall space, and the desired design effect.
Drapery Measuring Considerations
Drapery measuring usually involves more than the window width.
Important considerations may include hardware width, mounting height, rod or track position, stackback space, returns, overlap, finished length, floor clearance, fabric fullness, pleat spacing, and operation method.
For functional draperies, the width must support both coverage and operation. When closed, the panels should cover the intended area. They may also need enough center overlap and side return for better privacy and light control.
When open, the amount of fabric stack should also be considered. If the goal is to expose more glass, the hardware width and stackback space become especially important.
For stationary side panels, the width may be more visual than functional. These panels may not need to close, but they still need enough fullness and proportion to look intentional next to the window, wall, and hardware.
Drapery measuring is therefore not only a technical step. It is also a decision about proportion, function, and visual balance.
Roman Shade Measuring Considerations
Roman shades are structured fabric products, so small measurement differences can be more noticeable.
When measuring for a Roman shade, it is important to confirm whether the shade will be inside mount or outside mount. The finished width, finished length, headrail type, mounting depth, lift system, and fabric weight should also be considered.
Other details may include fold spacing, stack height, side light gaps, fabric thickness, lining thickness, and whether the shade will use a cordless or other specialized lifting system.
For inside mount Roman shades, the finished width must work with the actual opening size, required clearance, and smooth operation.
For outside mount Roman shades, the finished width and length should be based on the intended coverage area. Side coverage, top mounting height, and bottom coverage all affect the final appearance.
A Roman shade may look like a simple flat fabric treatment, but its measuring logic depends heavily on structure and installation.
Measuring for Hardware and Installation
All measurements should be connected to installation.
Hardware placement can change the final appearance of a window treatment. A drapery rod mounted higher can make the room feel taller. A rod mounted wider can allow more of the fabric stack to sit outside the glass area.
A Roman shade mounted above the opening can expose more glass when raised. A shade mounted inside the opening can look cleaner and more architectural, but it requires more precise sizing and adequate mounting depth.
A useful measuring note should record not only the size, but also the reason behind the size.
For example, is the width intended to cover the opening, or to allow the drapery to stack off the glass? Is the height intended to block light above the window, or to allow a Roman shade to clear the glass when raised?
These notes help the workroom and installer understand the design intention more accurately.
Commonly Confused Measurements
In custom window treatments, many problems are not caused by careless measuring. They happen because the meaning of each measurement has not been clearly defined.
Some commonly confused concepts include:
Window size and area to cover.
Area to cover and finished size.
Finished width and fabric width.
Inside mount size and outside mount size.
Hardware width and treatment width.
Stackback space and finished width.
Whether returns, overlap, or other allowances are included in the finished size.
If these terms are not clarified in advance, different people may interpret the same numbers in different ways.
For example, a designer may be describing the area the treatment should cover, while the workroom understands the number as the finished product width. Or a client may provide the window size, while the project actually requires an outside mount size with extra coverage.
A good measuring form should not only record dimensions. It should also explain what each dimension means.
The Best Method: Use a Clear Measuring Form
To reduce misunderstanding, measuring information should not rely only on verbal notes or short comments.
A clear measuring form may include:
Window or area number.
Installation location.
Area to cover.
Finished width.
Finished length.
Inside mount or outside mount.
Hardware type.
Returns, overlap, stackback, or extra coverage.
Bottom finish position.
Special installation conditions.
Measured by, approved by, and confirmation date.
For complex situations, simple sketches, photos, or installation notes can also be helpful.
A measuring form is not just a record of dimensions. It is a connection between the design intention, fabrication requirements, and installation logic.
When the meaning of each measurement is clearly documented, the later stages of custom window treatment production become much more stable.
Final Notes
Measuring is both a technical step and a design decision.
A good measuring process does more than capture accurate numbers. It considers proportion, function, hardware, fabric behavior, and installation conditions together.
Clear measuring language helps designers, clients, workrooms, and installers communicate around the same size logic.
When area to cover, finished size, inside mount, outside mount, returns, overlap, and hardware allowances are clearly defined, the finished treatment is more likely to look balanced, intentional, and true to the original design.
Related Notes
If you’d like to continue from the basic measuring concepts into more specific applications:
How to Measure for Drapery
A step-by-step look at the measurements, coverage, hardware, stack-back, finished length, and site conditions involved in planning custom drapery.
Read the article →
How to Measure for Roman Shades
A practical guide to inside- and outside-mount Roman shade measuring, including mounting conditions, finished size, and coverage.
Read the article →
Comments are closed.