
In pleated drapery, pin setting can seem like a very small finishing detail. In practice, however, it has a direct effect on how the heading relates to the hardware, how much of the carrier or ring remains visible, and even where the finished panel ultimately sits.
Here, pin setting refers to the position where the drapery pin or hook is inserted into the back of the heading, particularly how far that point sits below the top edge of the curtain.
There is no single setting that works for every system.
Different rods, rings, carriers, and tracks can place the actual suspension point at different heights. Some workrooms or hardware suppliers provide recommended pin settings for specific systems. In other cases, the relationship has to be worked out from the hardware itself.
The more I compared different systems, the more useful it became to think of pin setting not as a fixed number, but as a relationship between the heading and the actual hanging point.
Start With the Actual Hanging Point
Before deciding where the pin should be inserted, it helps to first understand where the curtain is actually being supported.
A decorative ring may suspend the curtain from an eye below the ring. A traverse rod uses a carrier. A track system may use a glider or carrier with its own drop.
The important reference is therefore not simply the shape of the rod or track, but the location of the point that actually carries the curtain.
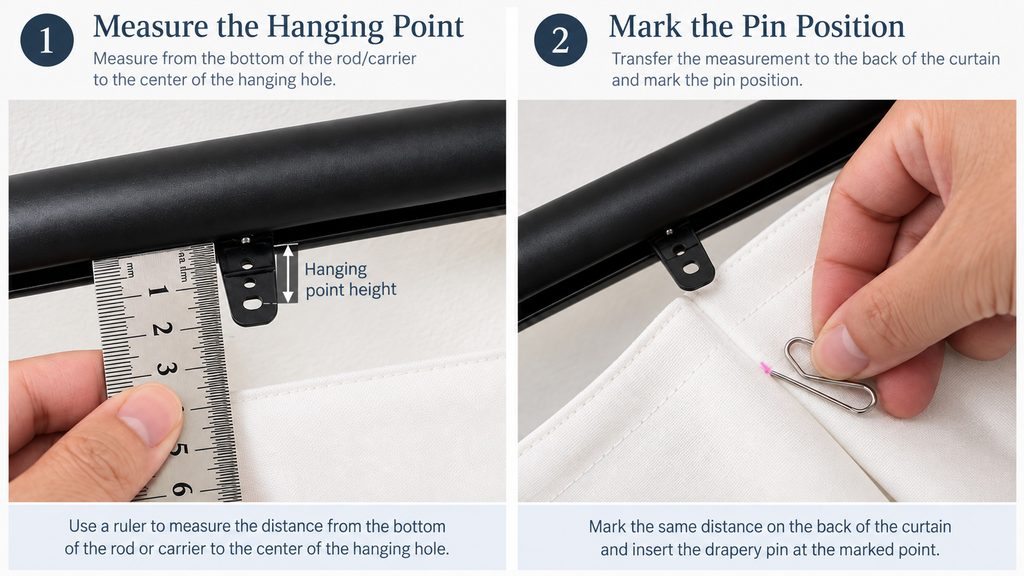
If the hardware manufacturer or supplier already provides a recommended pin setting, that specification is usually the best starting point.
When no setting is provided, measuring the actual hanging point can help establish a practical reference.
In the example above, the distance is measured from the lower reference point of the hardware to the center of the suspension hole.
The goal is not to measure the total length of the carrier, or the total length of the pin itself. What matters is the relationship between the hardware and the point where the curtain will actually hang.
That same reference can then be transferred to the back of the heading and used to establish the pin position.
A Simple Pin-Setting Process for Decorative Rings
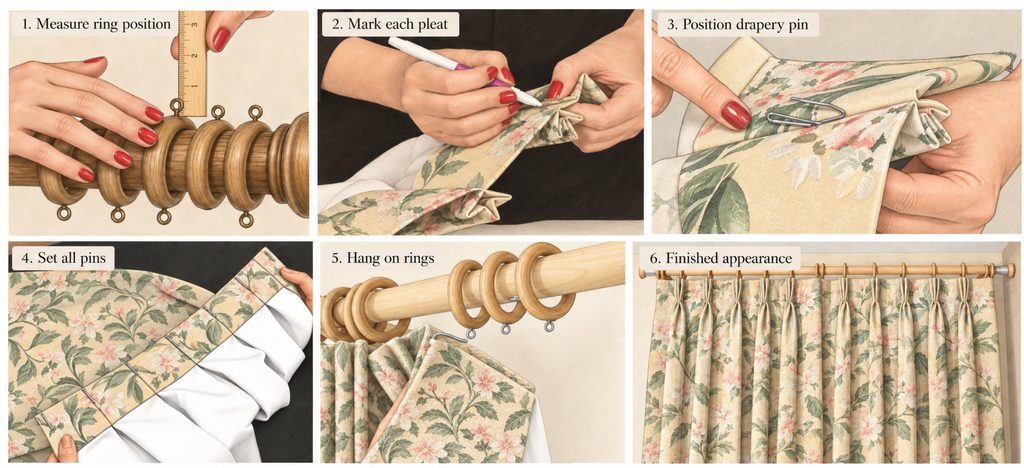
A decorative rod with rings is a useful example because the relationship between the rod, ring eye, hook, and heading is easy to see.
1. Measure the ring position
First, identify the actual hanging point of the ring.
The ring diameter, the eye below the ring, and the overall drop all affect where the curtain will finally sit.
2. Mark each pleat
Once the setting is established, transfer the same reference to the back of each pleat.
Consistency is important. The goal is to use one setting across the entire panel rather than positioning each hook individually by eye.
3. Position the drapery pin
Place the pin at the marked position and check how it sits within the heading construction.
The pin needs enough support from the heading material or buckram, while remaining safely behind the face fabric.
4. Set all pins consistently
Insert all pins at the same height.
Small differences from pleat to pleat can become surprisingly visible once the panel is hanging.
5. Hang the panel on the rings
Attach each pin to the corresponding ring eye.
This is where the relationship between the chosen setting and the actual hardware becomes visible.
6. Check the finished appearance
The final check is not simply whether the curtain can be hung.
I look at whether the heading sits evenly, whether the rings or carriers are more visible than intended, whether the pleats fall naturally, and whether the finished length still relates correctly to the floor.
In this sense, pin setting becomes one of the final links between fabrication and installation.
How Pin Height Changes the Finished Position
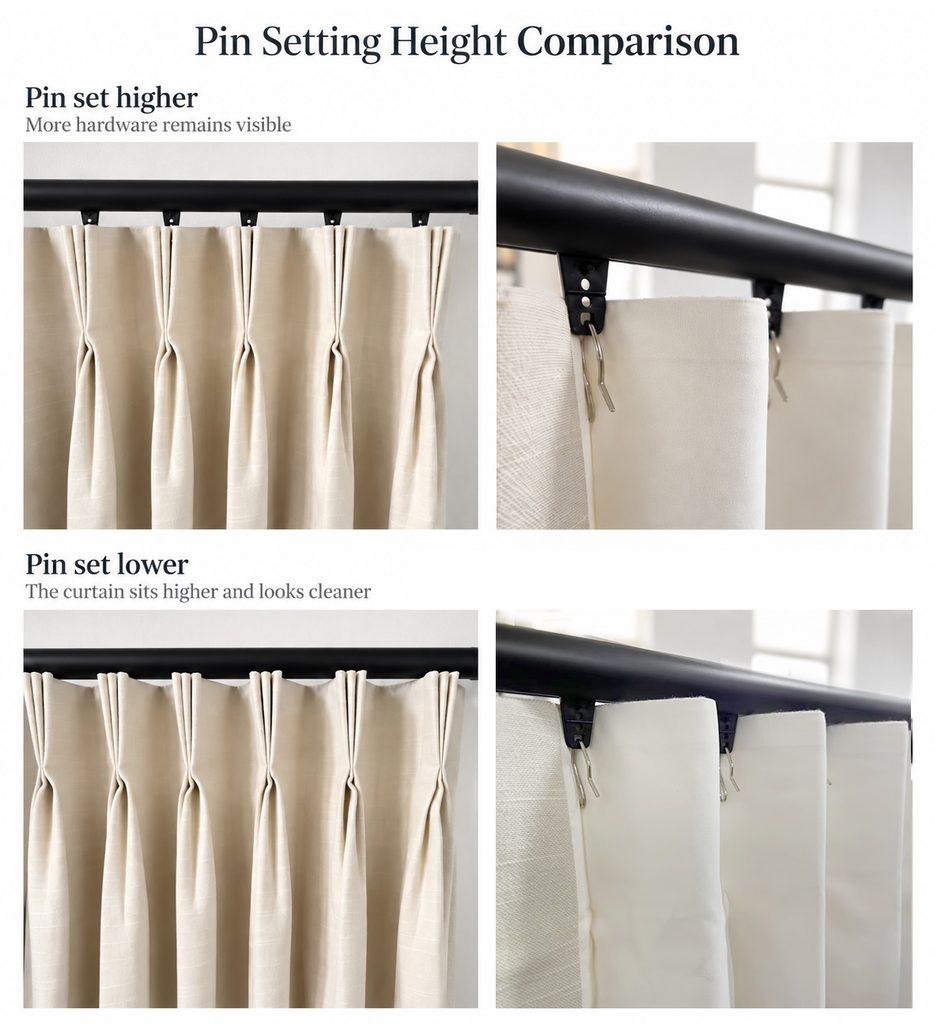
This is the part that can feel slightly counterintuitive.
When the pin is inserted higher on the heading, closer to the top edge, the curtain will hang lower from the same suspension point.
When the pin is inserted farther down the heading, the top of the curtain will sit higher relative to the hardware.
A simple way to remember it is:
The farther down the heading the pin is set, the higher the curtain will sit relative to the hardware.
Pin set higher
A higher pin position generally means:
- the curtain top sits lower
- more of the carrier or attachment hardware may remain visible
- the gap between the heading and the rod or track may become more noticeable
Pin set lower
A lower pin position generally means:
- the curtain top sits higher
- the heading can move closer to the hardware
- some of the carrier, glider, or track may be better concealed
But lower is not automatically better.
If the pin is set too far down, the heading may rise too high and interfere with the rod, track, carrier, or normal curtain movement.
The correct position still depends on the hardware system and the finished appearance being targeted.
Track Systems Often Need a Different Setting
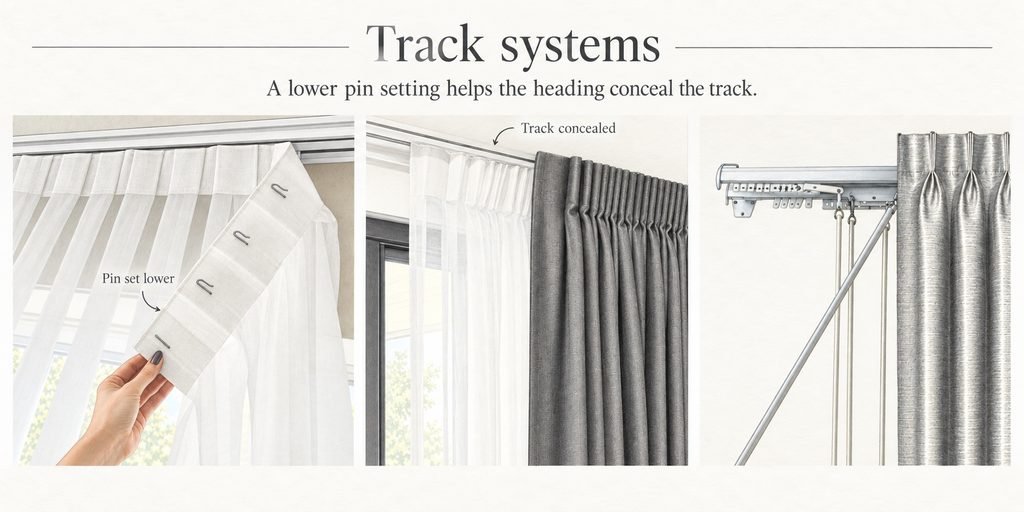
Track-mounted drapery often has a different visual goal from decorative rods.
With many non-decorative track systems, the intention is to minimize the visibility of the track and carriers so that the eye reads the curtain rather than the hardware.
For that reason, a lower pin setting is often useful because it allows the heading to sit higher and cover more of the track.
This is also why some professional pin-setting guides recommend a deeper setting for non-decorative traverse tracks than for decorative traverse rods.
The idea is not that one number is universally correct.
Track profiles, carrier heights, glider drops, and mounting conditions all vary.
Even within the category of track systems, the required setting can therefore change.
Hardware Matters

Looking at several hardware systems side by side makes the principle easier to understand.
Square rods, round rods, decorative rings, track gliders, traverse rods, and other systems may all create different suspension points.
What matters most is not the outside shape of the hardware, but the location of the point where the curtain is actually carried.
For example:
- a larger ring can create a different drop
- a taller carrier can lower the suspension point
- a glider positioned inside or below a track can change the relationship again
- different hardware profiles may require a different visual clearance above the heading
This is why no single pin setting works for every system.
If a supplier provides a recommended setting, use it as the starting point.
If not, the actual suspension point and the desired finished appearance become the practical references.
Pin Setting and Finished Length
Pin setting also affects finished length.
The curtain panel itself may not change at all, but the position of the hook changes where that panel hangs.
With the same panel length:
- a higher pin setting makes the curtain hang lower
- a lower pin setting makes the curtain hang higher
That means finished length, hardware suspension point, and pin setting need to be considered together.
A panel can be fabricated to the correct physical length and still hang incorrectly if the pin setting does not match the hardware reference used during measuring.
This is one reason I no longer think of pin setting as an isolated workroom detail.
It is part of the finished-length system.
Consistency Across the Panel
Once the correct setting has been established, repeating it accurately across the entire panel is just as important.
If individual pleats are pinned at slightly different heights, the result may show as:
- an uneven top line
- individual pleats sitting higher or lower than the others
- small changes at the bottom hem
Marking the setting before inserting all the pins creates a more repeatable result than adjusting each hook individually during installation.
The goal is not only to find one correct point.
It is to reproduce that point consistently.
There Is No Single Pin Setting
After comparing different hardware systems and hanging the same type of heading at different pin heights, the most useful conclusion is also the simplest:
There is no single pin setting that works for every drapery system.
A pin setting may come from:
- a hardware manufacturer’s recommendation
- a supplier or workroom standard
- or a setting established from the actual suspension point and desired finished appearance
Decorative rings may call for one relationship.
Track systems may call for another.
Layered or under treatments may introduce another variation again.
So rather than treating pin setting as one fixed number, I find it more useful to think of it as the coordination of three things:
the heading, the hardware, and the finished length.
Closing Note
Pin setting is a small detail, but once different systems are compared side by side, it becomes clear how much it connects measuring, fabrication, hardware, and installation.
I had been familiar with the basic idea for years, but measuring the actual hanging points and comparing different pin heights helped me understand the relationship more clearly.
Sometimes only a small change in the pin position is enough to change how much hardware is visible, how clean the top line appears, or where the curtain finally meets the floor.
So when I look at pleated drapery now, I do not only look at the pleat itself.
I also look at where it is actually hanging.
Comments are closed.