
In the previous overview of valances, we discussed how different valance styles can be mounted in different ways. Among them, board-mounted valances are one of the most common structural approaches.
The term board-mounted does not describe one specific visual style. Instead, it refers to the way the valance is supported: a mounting board, or head board, provides the structural base, and the valance is then attached to that board using different methods.
A tailored valance, a pleated valance, or even a more decorative shaped treatment may all use a similar board-mounted structure.
This is why, when looking more closely at valance construction, the front appearance is only part of the story. The board behind the fabric, the returns, the attachment method, and the relationship with the treatment underneath all affect the final result.
1. Basic Structure of a Board-Mounted Valance
A basic board-mounted valance usually includes several main components:
the mounting board or head board, brackets, the valance face, and the side returns.
The mounting board forms the structural base of the treatment. It may be installed to the wall, ceiling, or another suitable architectural surface depending on the project.
The valance face is the main visible section, while the returns wrap back toward the wall to finish the sides of the treatment.
From the front, a valance may appear relatively simple. From the side, however, it becomes a three-dimensional structure with depth, projection, and return.
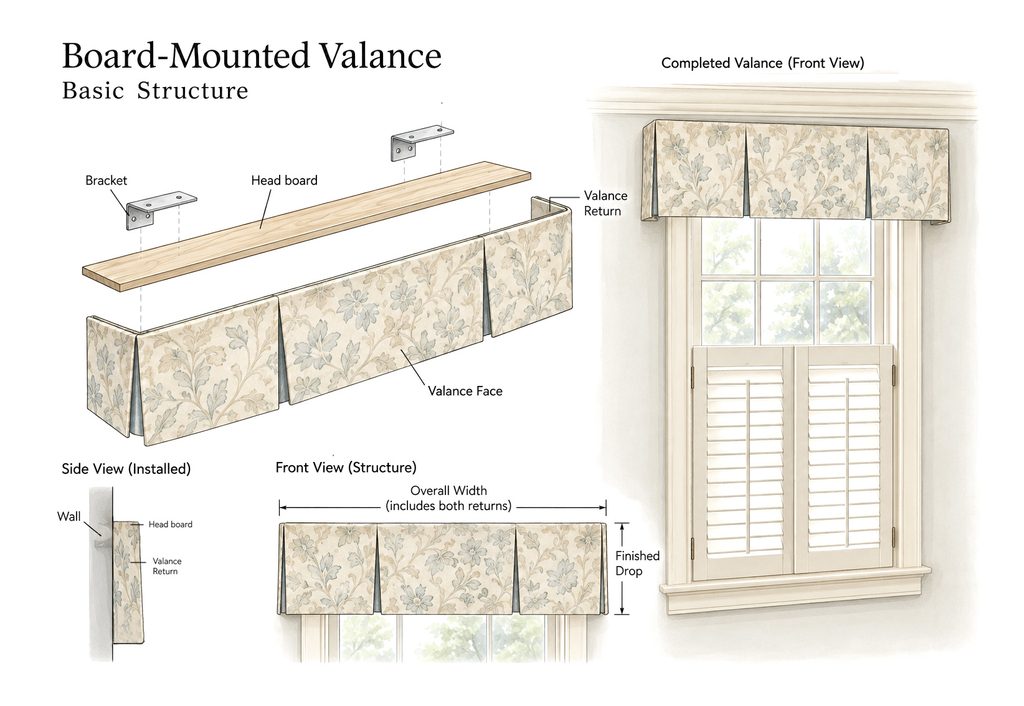
For extra-wide valances, the mounting board does not always need to be made as one continuous piece.
To make shipping, handling, and site access easier, a long board may be divided into two or more sections and reconnected on site using joining plates, mending plates, or similar connectors.
This is mainly a practical installation and transportation detail and does not change the finished appearance of the valance.
2. How Is the Valance Attached to the Board?
Board-mounted does not mean that every valance is attached in the same way.
Different workrooms, manufacturers, and projects may use different methods. Two of the most common approaches are:
stapled attachment and hook-and-loop attachment.
These methods are not always mutually exclusive. In some treatments, staples may be used to finish or wrap the board, while hook-and-loop tape is used to attach the removable valance itself.
3. Stapled Attachment
A traditional workroom method is to attach the valance directly to the mounting board using a staple gun.
The staples may secure a top band, fabric allowance, or another prepared section of the valance to the board.
Once the treatment is finished, the staples are usually hidden by the fabric, folds, lining, or other finishing details, so they are not visible from the front.
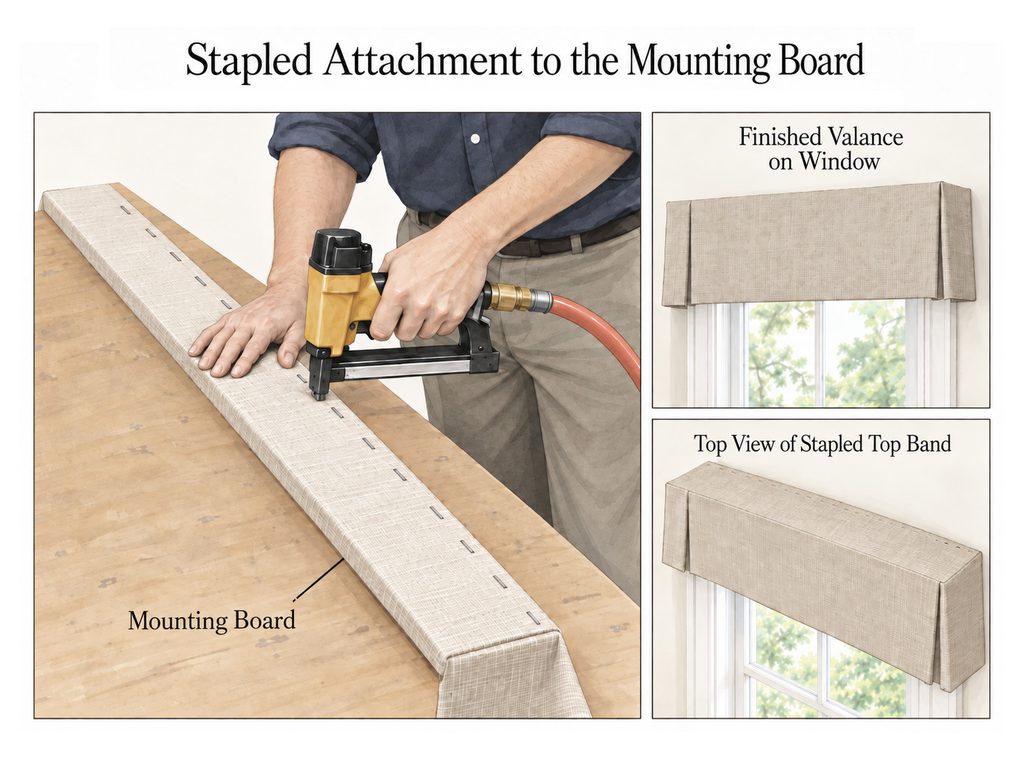
A stapled attachment does not necessarily mean that the board itself remains exposed.
The board may be left bare, wrapped in fabric, or otherwise finished before the valance is attached. The exact construction depends on the treatment design, workroom technique, and installation requirements.
For this reason, stapling is best understood as an attachment method, rather than one fixed construction style.
4. Hook-and-Loop Attachment
Another common approach is to use hook-and-loop tape to connect the valance to the mounting board.
The main advantage is removability. The valance can be detached more easily for transportation, installation, adjustment, or future maintenance.
Even within hook-and-loop construction, however, the structure can vary.
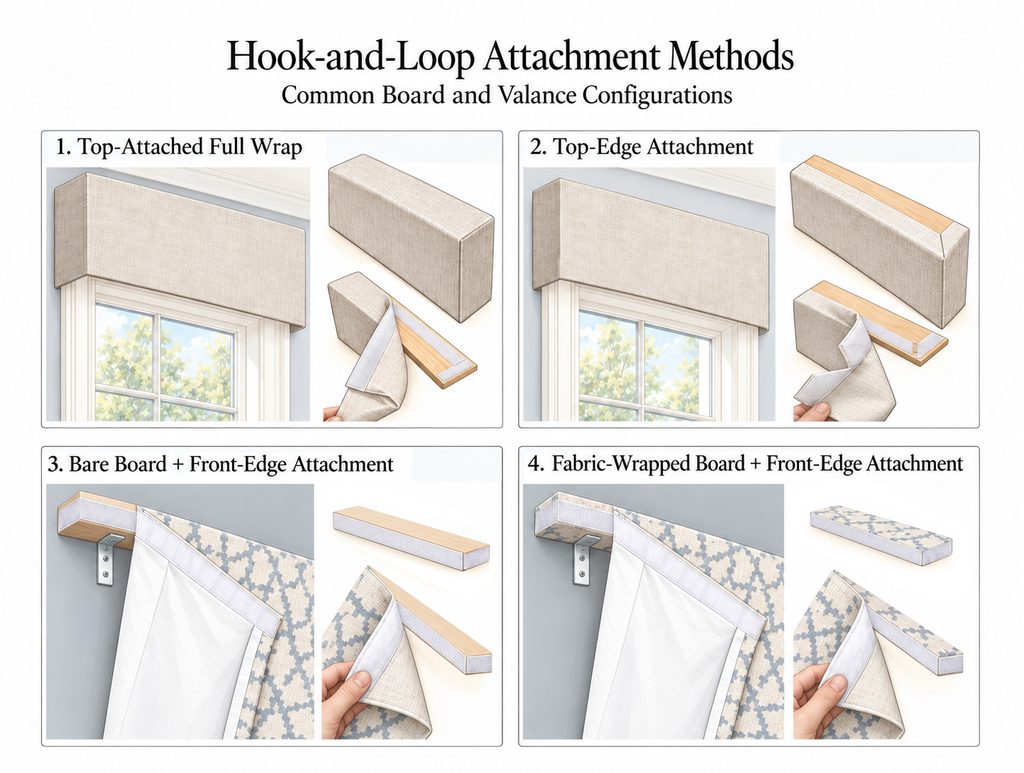
Some valances are made almost like a slipcover, with the top, face, and returns formed as one continuous piece and attached over the top of the board.
In other constructions, the hook-and-loop tape is positioned close to the front edge of the board, allowing the valance to fall down from that point.
Another common approach is to place the hook-and-loop tape along the front edge or thickness of the board.
In these cases, the mounting board may remain bare, or it may first be wrapped in fabric before the hook-and-loop tape is applied.
This means that the attachment method and the board finish are related, but they are not exactly the same thing.
From the finished front view alone, it is often difficult to know which construction method has been used.
The examples shown here are therefore best understood as common configurations, not as universal standards. Different workrooms may handle corners, board wrapping, tape placement, and finishing details in different ways.
5. Aluminum Valance Tracks as an Alternative Support
A board-mounted valance is often associated with a wood mounting board, but wood is not the only possible support structure.
Some valances are also mounted to aluminum valance tracks or profiles.
Compared with a traditional wood board, an aluminum support system can be lighter and easier to handle, transport, and install.
Straight and curved versions can also be used depending on the design.
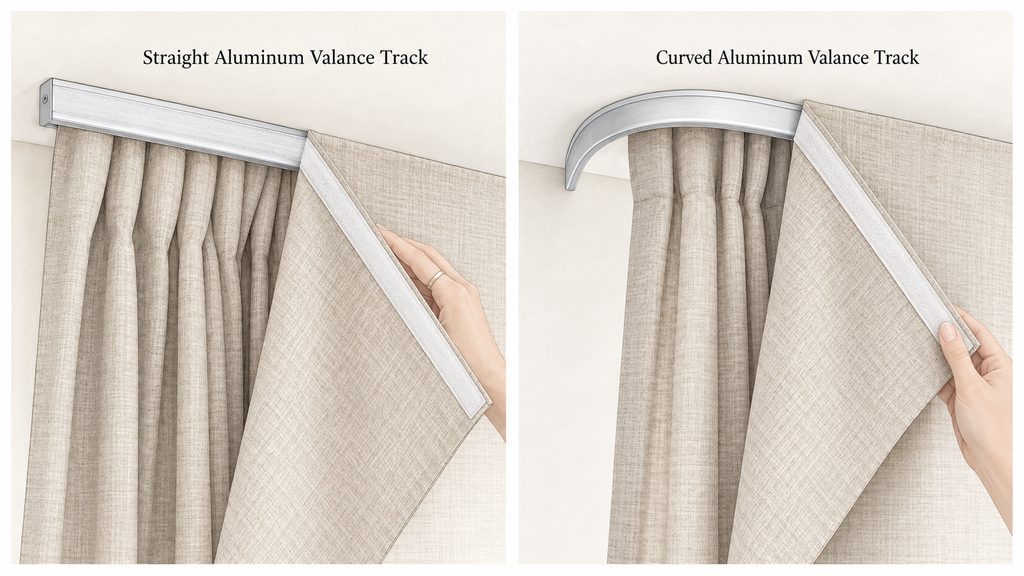
In some applications, the valance is attached directly to the aluminum profile with hook-and-loop tape.
This can be a useful option when weight, transportation, or installation access is an important consideration.
It is not necessarily a replacement for a wood mounting board, but rather another support option that may suit certain projects.
6. Projection, Return & Clearance
When a valance is installed by itself, the structure is usually relatively simple.
But when the valance sits over a Roman shade, blind, drapery, or other hardware, the required depth needs to account for the treatment underneath.
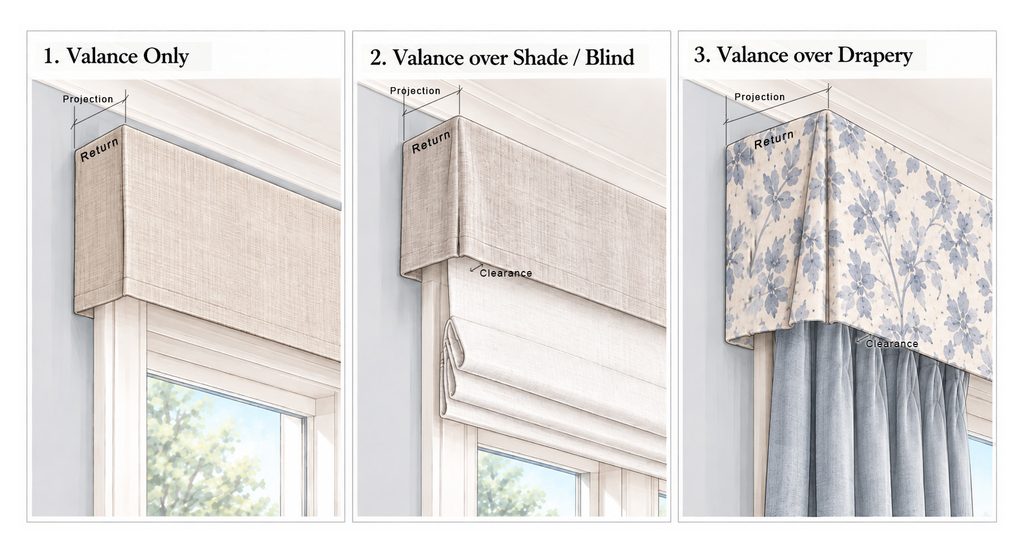
Projection
Projection describes how far the valance extends outward from the wall.
The required projection depends largely on what needs to fit behind or underneath the valance.
A valance used on its own may require only a shallow projection. A valance covering a shade, blind, or drapery system may need greater depth.
Return
The return is the side section of the valance that turns back toward the wall.
In a simple rectangular board-mounted valance, the return depth and the projection are often very similar, and in some cases essentially the same.
However, the two terms describe different things.
Projection describes the overall distance from the wall to the front of the treatment, while return describes the side portion that completes the valance at each end.
With offset mounting, unusual board construction, or different finishing methods, the two may not be exactly the same.
Clearance
Clearance is the remaining space that allows the treatment underneath, along with its hardware, to operate without interference.
For example, when a valance is installed over a Roman shade or blind, the headrail, folds, roller, or operating mechanism needs enough room to move freely.
When a valance covers drapery, the track, rod, carriers, heading, and moving fabric must also be considered.
Clearance should therefore not be treated as one fixed dimension.
It needs to respond to the actual depth and movement requirements of the treatment underneath.
7. What Changes the Finished Look?
Even when two valances have a similar front shape, differences in the hidden structure can noticeably change the finished appearance.
A shallow projection can make a valance feel closer to the wall, while a deeper projection gives the treatment more dimensional presence.
The finished drop also changes the visual proportion.
A shorter valance may feel lighter, while a deeper drop creates a stronger architectural effect but also covers more of the window.
Fabric weight, lining, interlining, pleating, and the way the returns are finished can all influence the final result as well.
For this reason, designing a board-mounted valance is not only about choosing a front shape.
It also involves coordinating the structure, the attachment method, the depth, and the treatment underneath.
Conclusion
Board-mounted describes a structural approach, not one fixed construction method.
Different workrooms, manufacturers, and projects may use different boards, attachment methods, return details, and finishing techniques.
What matters most is that the support structure, attachment method, depth, and undertreatment work together.
When these relationships are resolved well, the valance can meet the practical requirements of installation and operation while still achieving the intended proportion and finished appearance.