

Before a custom drapery or Roman shade goes into production, many construction details should be reviewed and clearly defined.
These details may seem small, but they directly affect finished size, visual proportion, operation, installation, and consistency across a project.
Clear workroom standards are not meant to limit design. Instead, they create a shared language between designers, workrooms, installers, and clients. The clearer the standards are, the easier it becomes to produce custom window treatments with consistency, accuracy, and professional quality.
Why Standards Should Be Reviewed Before Production
Custom window treatments are not made from fabric and measurements alone.
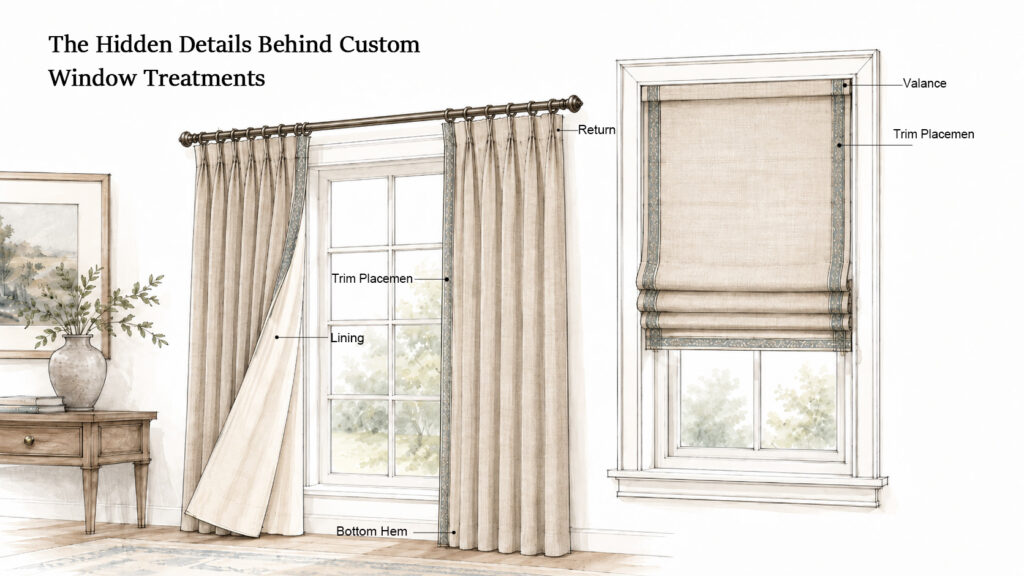
The same fabric can produce very different results depending on hem size, side edge construction, lining choice, pleat spacing, return depth, overlap allowance, and hardware requirements.
If these standards are not reviewed before production begins, many issues may appear later. A drapery may leave a center gap when closed. A Roman shade may stack unevenly. Pleat spacing may vary from one window to another. Trim placement may not align across a room. Finished width and the intended area to cover may also be misunderstood.
The purpose of a workroom standard is not simply to say how something should be made. It is to make every important detail visible, confirmed, and documented before the work begins.
1. Bottom Hem Standards
The bottom hem is one of the most important finishing details in drapery and shade construction.
For drapery, the bottom hem does more than finish the fabric edge. It affects weight, drape, structure, and the overall visual proportion of the panel. A hem that is too light may make the treatment feel thin or unfinished. A hem that is too heavy may make certain fabrics appear stiff.
Before production, the bottom hem depth, hem type, and any weighting method should be confirmed. For lined, blackout-lined, or interlined treatments, the added thickness should also be considered.
When several treatments are used in the same project, bottom hem depth should be reviewed as a group. Consistent hem standards help the finished room feel more unified and professionally made.
2. Side Hem Standards
Side hems help control the vertical edges of a drapery panel.
They affect how clean, stable, and tailored the panel appears from top to bottom. Side edge construction also relates to lining, decorative trim, returns, and leading edge details.
Before production, the side hem depth should be confirmed. It should also be clear whether the left and right sides use the same construction, or whether the leading edge and outside edge require different treatment.
If decorative tape, welt, contrast banding, or edge detail is used, its exact placement should be specified before fabrication begins.
For functional draperies, side edge standards can also affect closure, edge stability, and how the panel relates to the hardware.
3. Seams and Fabric Joining
Many draperies and Roman shades require fabric widths to be joined.
If seam placement is not planned carefully, it can affect the face appearance of the finished treatment. This is especially important for wide drapery panels, narrow Roman shades, patterned fabrics, and fabrics with visible texture or direction.
Before production, it should be confirmed whether the fabric needs to be joined, where seams will fall, whether pattern matching is required, and whether the fabric direction is consistent.
For Roman shades, seam placement requires extra attention. Because the face of a Roman shade is often viewed as a flatter surface, an awkward seam can be more noticeable than it might be on a drapery panel.
Good seam planning is not only about joining fabric widths. It is about preserving the visual balance of the finished treatment.
4. Lining Standards
Lining affects both the function and appearance of a custom window treatment.
Standard lining can improve privacy and create a cleaner exterior view. Blackout lining can improve light control. Interlining can add softness, body, insulation, and a more luxurious hand.
Before production, the lining type should be confirmed. This includes whether the treatment will be unlined, lined, blackout lined, or interlined. Lining color, weight, and compatibility with the face fabric should also be reviewed.
Lining is not simply a backing material. It can change how a drapery hangs and how a Roman shade folds, stacks, and operates.
When multiple treatments are used in one project, lining color and exterior appearance should also be considered, especially when the backs of the treatments are visible from outside the home.
5. Return Standards
A return is the side portion of a drapery or treatment that turns back toward the wall, bracket, or hardware.
Returns help cover side gaps, reduce light leakage, and create a more complete relationship between the treatment and the wall.
Before production, it should be confirmed whether a return is required, how deep the return should be, whether it is included in the finished width, and how the hardware projection affects the return.
Return depth must be considered together with installation method. Wall-mounted hardware, ceiling-mounted tracks, decorative rods, and other systems may each require different return planning.
If return standards are not clearly defined, misunderstandings can occur between the intended area to cover and the finished width required for construction.
6. Center Overlap Standards
Center overlap is the area where two drapery panels cover each other when closed.
For functional draperies, overlap is especially important. It affects privacy, light control, and the finished appearance when the panels meet at the center.
Before production, it should be confirmed whether overlap is required, how much overlap is needed, which hardware system it applies to, and whether the left and right panels will close naturally with the intended overlap.
If overlap is not defined clearly, the panels may leave a visible gap when closed.
This is often not a fabric issue. It is usually a specification issue involving finished width, coverage, overlap allowance, and hardware logic.
7. Leading Edge and Outside Edge Standards
The leading edge is usually the inner front edge of a drapery panel, especially where the panel closes toward the center. The outside edge is the outer vertical edge, often located near the wall, return, or end of the hardware.
These two edges may look similar, but they do not always serve the same purpose.
The leading edge affects closure, overlap, front view, and decorative edge placement. The outside edge relates more to side coverage, return, wall connection, and hardware position.
Before production, the construction of both edges should be confirmed. This includes edge width, fold structure, hook placement, decorative tape, banding, welt, return connection, or any other special detail.
Clearly distinguishing between the leading edge and outside edge helps prevent many errors in construction and measurement interpretation.
8. Trim, Welt, and Banding Standards
Decorative tape, welt, contrast banding, and other trim details can add character and definition to a custom window treatment.
However, these details require precise planning. A small difference in placement can become very visible, especially when several windows are installed in the same room.
Before production, trim placement should be specified clearly. It should be noted whether the trim is applied along the leading edge, side seam line, bottom hem line, outside edge, or wrapped around the edge.
When the same trim detail is used on draperies, Roman shades, valances, pillows, or other soft furnishings, the relationship between these placements should also be reviewed.
Corner treatment is another important detail. When banding or trim runs in more than one direction, mitered corners often create a cleaner and more tailored appearance.
9. Roman Shade Construction Standards
Roman shades are both decorative and functional.
They must look balanced when lowered, stack neatly when raised, and operate smoothly over time. For this reason, Roman shade construction standards are more complex than those for many flat fabric products.
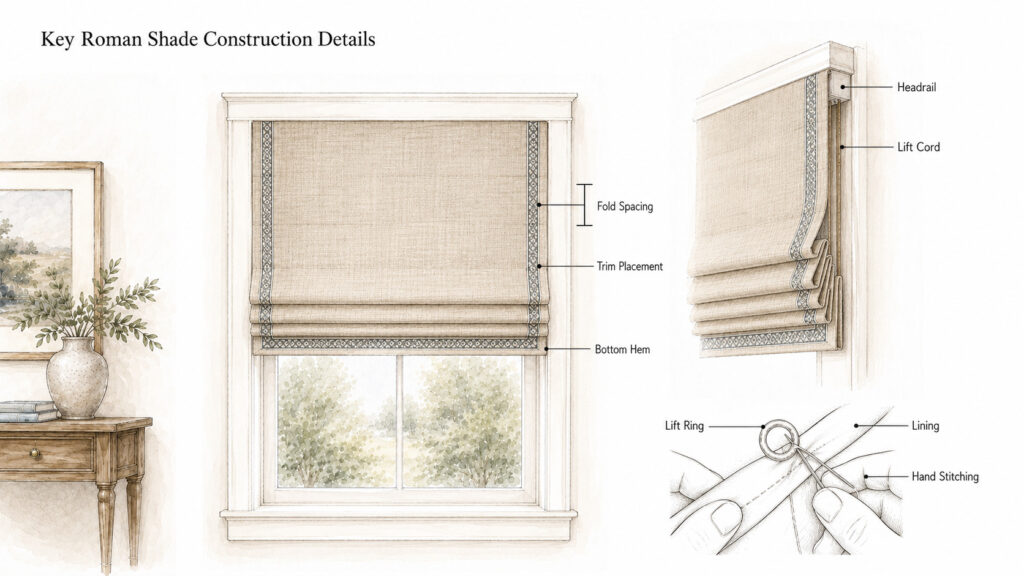
Before production, the shade style, fold spacing, batten or rib structure, ring placement, lift-line position, lining choice, headrail system, and lifting system should be confirmed.
If blackout lining, interlining, heavy fabric, or a special lifting system is used, finished weight and ease of operation should also be considered.
The beauty of a Roman shade depends heavily on consistent fold spacing, structure, and lifting logic. A well-made shade should look organized not only when it is lowered, but also when it is raised.
10. Drapery Pleat and Fullness Standards
Pleats shape the rhythm, fullness, and vertical movement of a drapery.
In high-quality custom work, pleat spacing, pleat depth, and finished width should be calculated together. Fullness should not be judged only by a simple fabric multiplier.
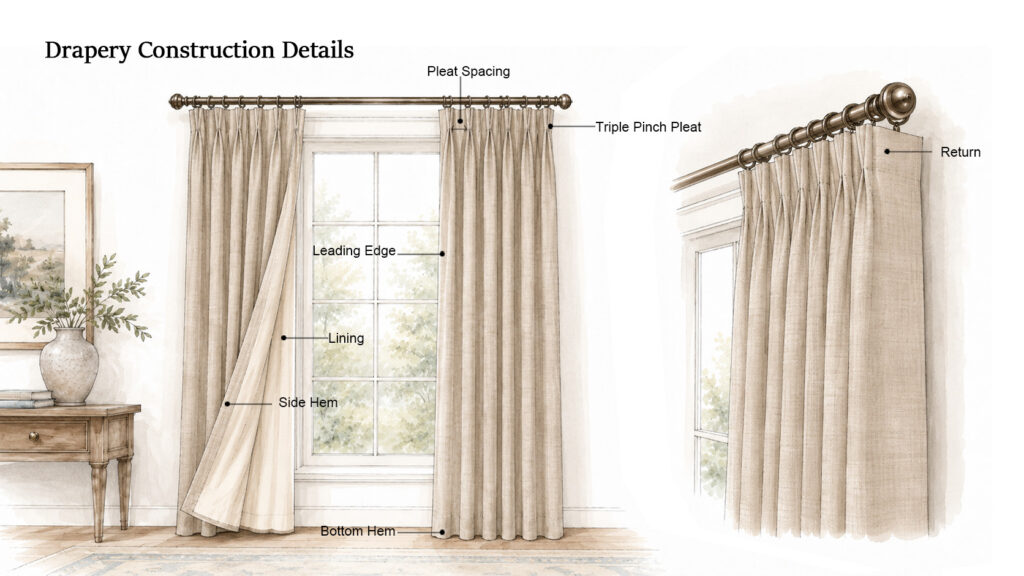
Before production, the heading style, pleat spacing, pleat depth, finished width, and project-wide consistency should be confirmed.
For functional draperies, coverage, returns, overlap, leading edge construction, and hardware type should also be considered.
A good drapery is not simply about using more fabric. It is about whether the pleat proportion, coverage, and operation work together in a balanced way.
11. Installation and Hardware Allowances
Window treatment construction cannot be separated from installation planning.
Hardware type, mounting position, bracket projection, track structure, rod rings, and lift systems can all affect the final size of the treatment.
Before production, the hardware type should be confirmed. This may include a decorative rod, traverse rod, ceiling track, wall-mounted track, Roman shade headrail, or other operating system.
The mounting method should also be reviewed, including inside mount, outside mount, wall mount, or ceiling mount. Bracket projection, return requirements, and hardware clearance should be checked before the treatment is made.
For Roman shades, it should be clear whether the shade is made to an inside mount size or an outside mount coverage size. For draperies, finished size and area to cover should be clearly distinguished.
Many measurement problems are not caused by sewing mistakes. They happen because the installation logic was not fully defined before production.
12. Project Consistency Review
When multiple treatments are used in the same room or project, consistency becomes more important than any single detail.
Before production, related details should be reviewed together. These may include pleat spacing, bottom hem depth, side edge standards, lining color, trim placement, Roman shade fold spacing, mounting height, and hardware logic.
A single well-made window treatment completes one product. A consistent group of treatments completes a project.
This is one of the quiet differences between ordinary fabrication and professional custom work.
The Best Method: Use a Complete Workroom Specification Sheet
To reduce missed details and communication errors, the most effective method is not to rely only on verbal confirmation. A complete workroom specification sheet should be used.
This form should list the key details that need to be confirmed before production, including measurements, style, fabric, lining, bottom hem, side hems, returns, center overlap, leading edge, outside edge, trim placement, lifting system, hardware requirements, mounting method, and any special construction notes.
Each item should be clearly filled in, selected, or marked. If a detail does not apply, it should be marked as not applicable rather than left blank.
For complex projects, the specification sheet may also include notes, diagrams, approval sections, confirmation dates, and revision records. This gives designers, clients, workrooms, and installers one shared document to reference.
A good specification sheet is more than an order form. It is a construction guide, a communication tool, and a quality-control reference.
When all key details are documented before production begins, the workroom can execute the project with greater consistency, and the finished treatment is more likely to match the original design intent.
Final Notes
Workroom standards are the quiet structure behind well-made custom window treatments.
They help design ideas become finished products that are beautiful, functional, consistent, and reliable.
In any high-quality custom project, the earlier these standards are confirmed, the smoother the communication becomes and the closer the finished result will be to the intended design.
A truly professional custom process is not only about knowing these standards. It is about turning them into written, checkable, and repeatable order documents.
That is how design requirements move beyond verbal discussion and become accurate details in the finished work.