
Recently, I revisited the installation process for pleated drapery on a traverse rod.
I started by studying an actual installation video, then reviewed related technical materials to better understand several details that are easy to overlook. Rather than looking at each hardware component in isolation, I wanted to see the process as a continuous sequence: how the panel is prepared for hanging, how it connects to the master carrier, how the remaining pins are placed into the slides, how the return is formed, and why the header and full-length folds still need attention after the drapery is already on the track.
Based on that research, I reorganized the process into a series of illustrations that make the sequence easier to observe and understand.
This is not intended to present one hardware system as a universal installation standard. It is simply a closer look at the logic behind a traditional traverse drapery installation.
Step 1 — Unpack the Drapery
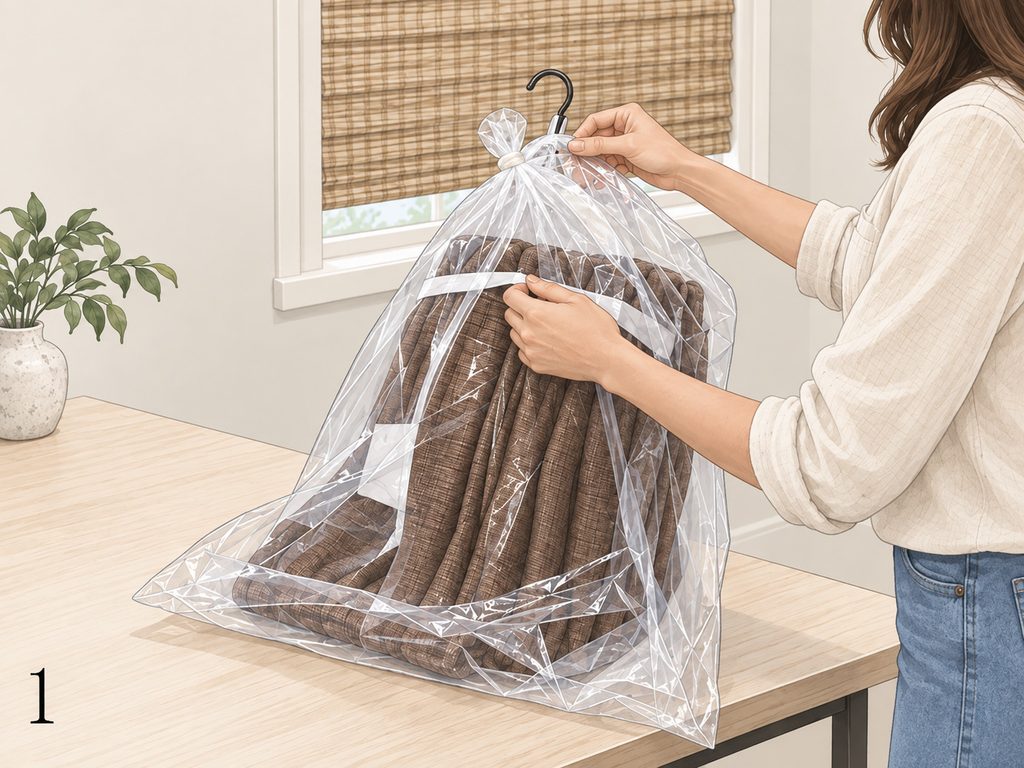
The process begins with removing the drapery from its protective packaging.
Once the panel is out, it is useful to check the face and lining, the heading, and whether the pins have already been inserted.
Some custom draperies arrive pre-pinned and can move directly into the hanging process. If the pins have not been set in advance, pin placement needs to be completed first.
Step 2 — Prepare to Hang the Drapery
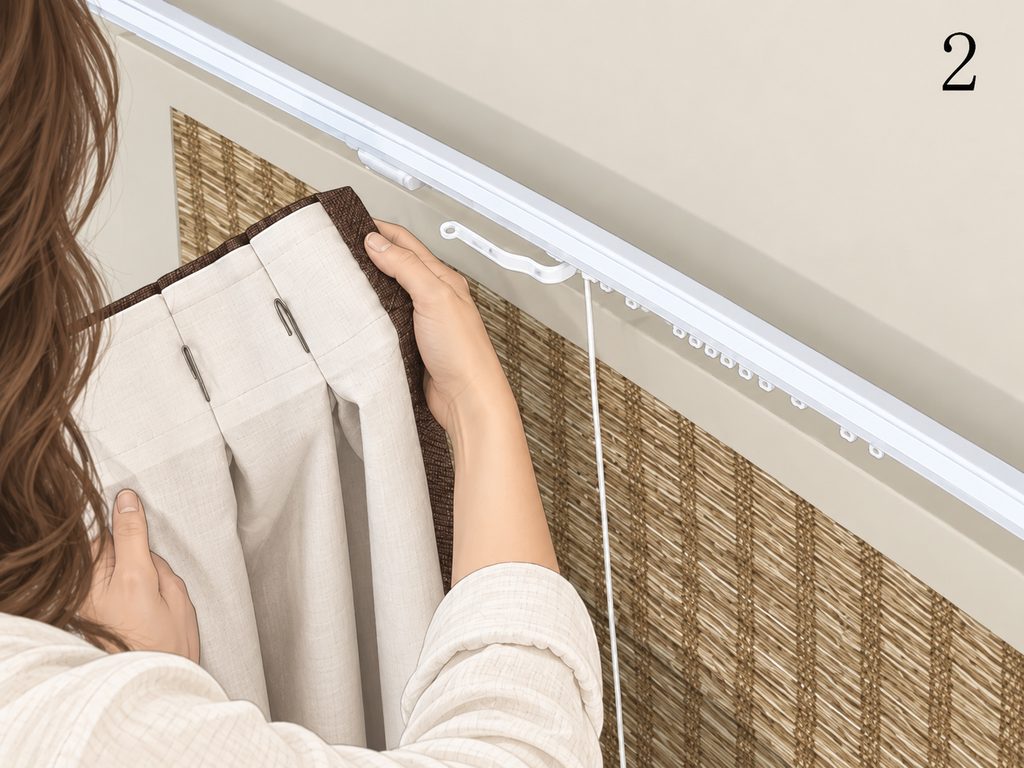
Bring the panel to the track and confirm the installation direction before attaching anything.
At this stage, the panel is not yet being hung. The goal is to identify which side faces the center, which side forms the return, and how the pins relate to the master carrier and the remaining slides or carriers.
It is a simple step, but getting the panel orientation wrong can affect both the center overlap and the return.
Step 3 — Attach the First Pins to the Master Carrier
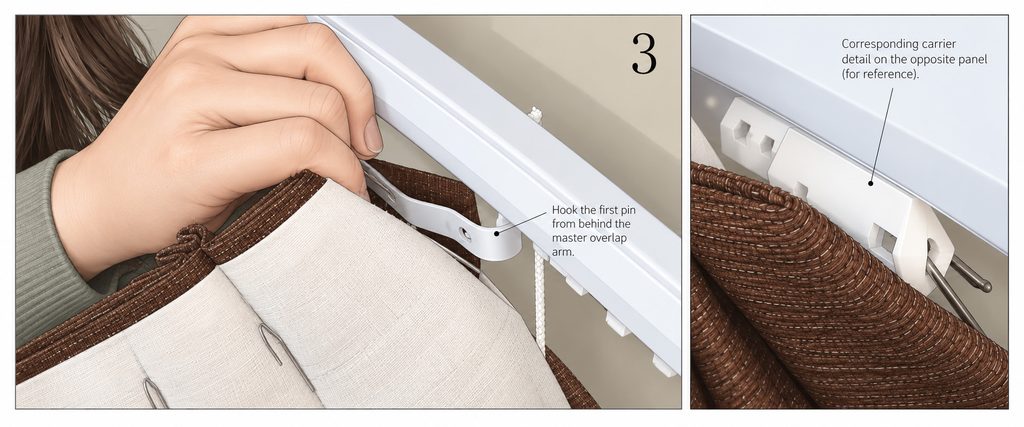
The actual hanging process begins at the master carrier.
The first two pins closest to the center do not simply connect to ordinary slides. In this system, the first pin hooks onto the end of the master overlap arm from behind, while the second pin connects to the base of the arm from the front.
This is one of the details I find especially useful to study.
It shows that center closing is not created simply by bringing two panels together. The final relationship is shaped by the panel, the pin positions, and the geometry of the master carrier working together.
The illustration also includes the corresponding carrier arrangement on the opposite panel as a secondary reference.
Step 4 — Hang the Remaining Pins onto the Slides
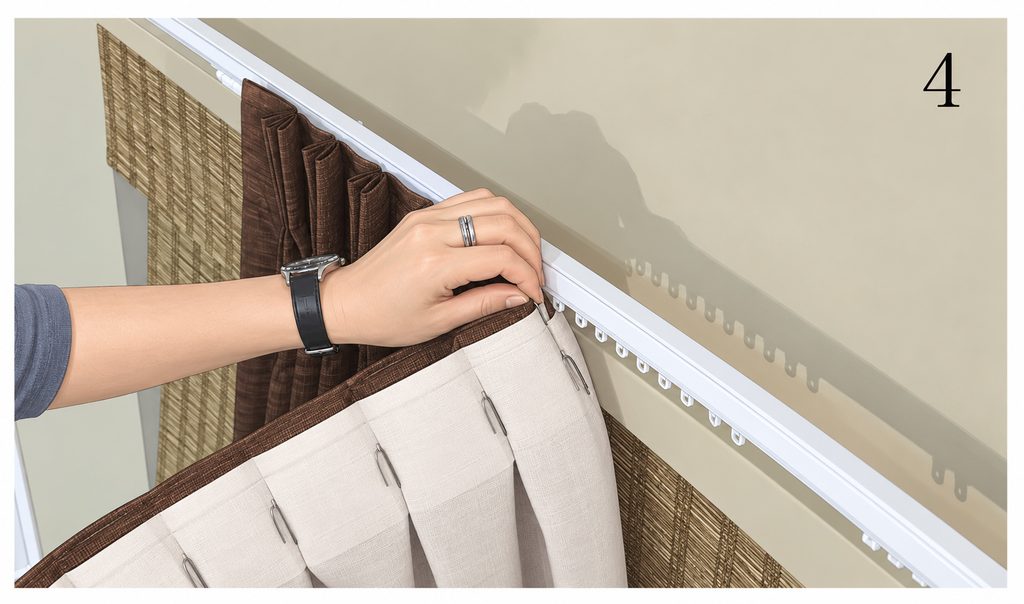
Once the master carrier connections are complete, the remaining pins can be attached one by one to the ordinary slides or carriers.
The logic is straightforward:
one pleat → one pin → one carrier
The important part is maintaining the sequence and direction of the panel so that each pleat connects to the correct carrier without skipping or disrupting the fold pattern.
For this right panel, two extra slides are left on the track as spares for future replacement. Any unnecessary extras can be removed once the panel is fully hung.
Step 5 — Form the Return
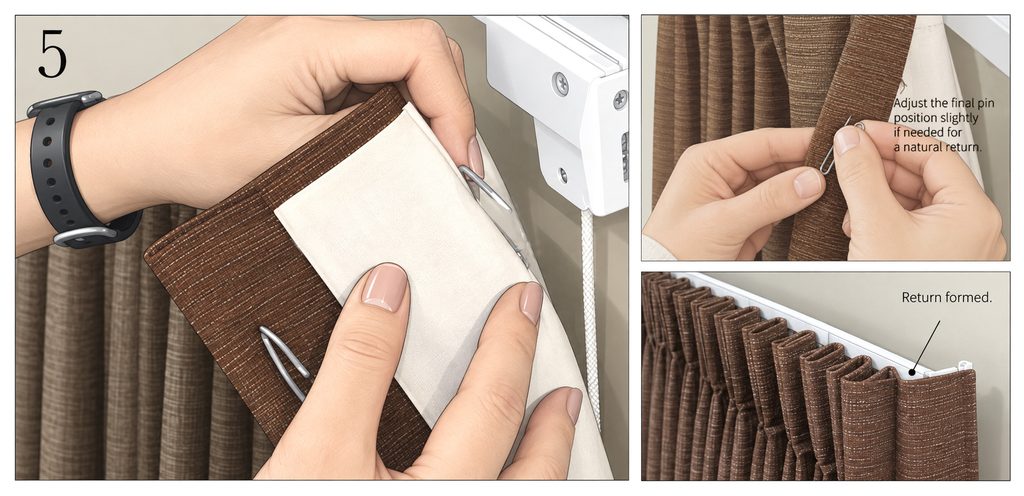
At the outer edge of the panel, the hanging method changes.
The final hooks connect to the corresponding attachment points at the rod end and bracket, allowing the panel to turn back toward the wall and form the return.
This is why I think the return is worth looking at as more than just a dimension on an order form.
Once installed, it becomes a three-dimensional relationship:
panel face → side edge → return → wall / bracket
If the return is too tight, the side edge can look pulled. If it is too loose, it may not wrap the hardware as cleanly.
In practice, the final attachment point may sometimes need a slight adjustment so the return settles naturally rather than being forced into position.
Step 6 — Train the Header Pleats
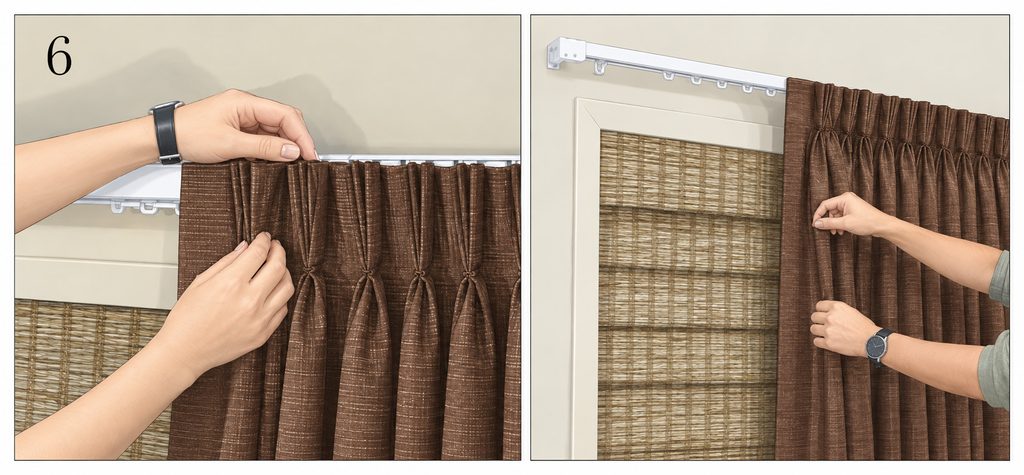
Once the panel is fully hung, the installation is still not finished.
The next step is to shape the header.
The goal is to establish a consistent fold direction in the heading stiffening or buckram between the pleats. A vertical crease is formed between each pleat so the header develops the intended forward fold pattern. This process is also commonly described as breaking the buckram.
This is not simply about making the heading look neater.
It establishes the initial fold direction for the entire panel. If the header does not fold consistently, the full-length folds below are much harder to train.
Step 7 — Continue the Fold Pattern Down the Panel
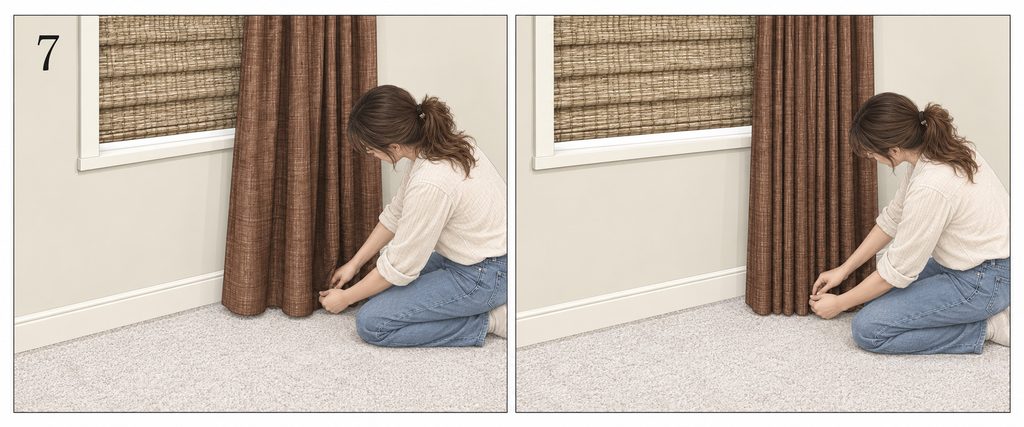
Once the fold direction at the header is established, that pattern needs to continue down the full length of the drapery.
At each pleat, the fabric is encouraged forward; between the pleats, it is pushed backward. The fold pattern is then worked progressively down the panel so the folds remain continuous from the heading to the hem.
Although the illustration focuses on the lower part of the panel, the fold pattern is established at the header first and then worked progressively downward. The folds are refined progressively as they continue toward the hem.
Step 8 — Band the Drapery and Let the Folds Set
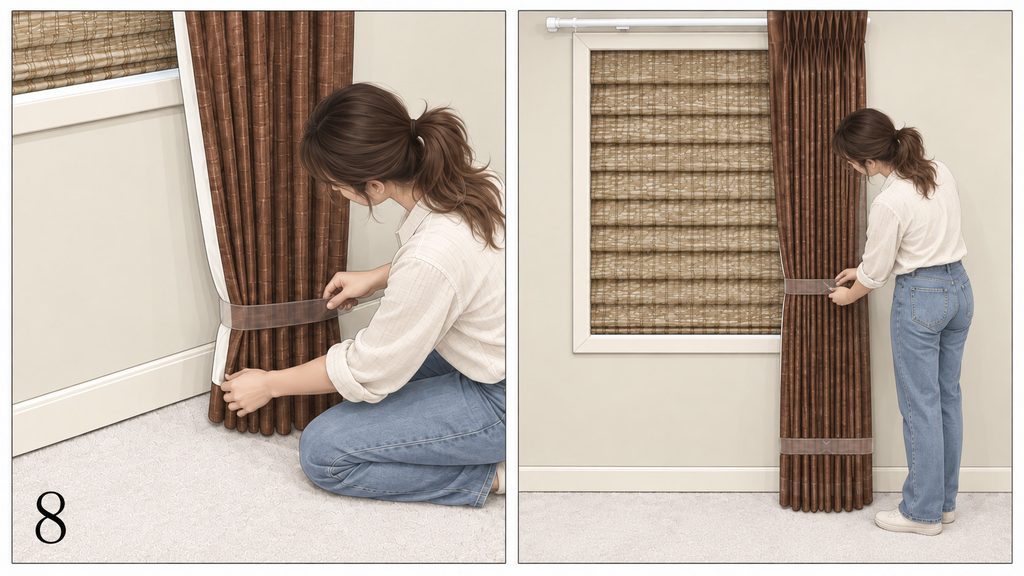
After the folds have been arranged from top to bottom, they can be temporarily held in position with paper bands, fabric bands, or another method that will not mark or damage the fabric.
As a practical reference, the folds can be checked and secured at intervals of roughly 30–36 inches (about 76–91 cm) while working down the panel. This is best understood as a useful range rather than a universal rule.
The bands can then remain in place for around three days, allowing the folds time to settle and develop a more consistent memory.
The exact number of days matters less than the principle: the fabric needs some time to hold the fold pattern that has just been shaped.
One Detail I Find Especially Interesting
After reorganizing the entire sequence, one thing becomes very clear:
the installation does not end when the last hook is attached to the track.
Hanging the panel completes the hardware connection, but the finished appearance still depends on the relationship between the master carrier, the return, the header shaping, and the full-length fold training.
Together, these steps influence how the pleated drapery hangs, how it stacks, and how naturally it returns to a consistent fold pattern after repeated opening and closing.
Different hardware systems and workroom practices may vary, but understanding these relationships makes it much easier to see how a traditional pleated drapery installation actually comes together.
Related Articles
Drapery Pin Setting Guide
A closer look at pin position, heading height, and the relationship between the drapery and its hardware.
Understanding Drapery Leading Edges and Side Edges
A deeper look at leading edges, side edges, overlap, and return.