Measuring a standard rectangular window is usually straightforward. Once the width, height, and mounting conditions are confirmed, the rest of the process is fairly predictable.
Arched and slanted windows are different.
With these windows, the challenge is not simply finding the overall width and height. The real task is to understand and record the shape of the opening accurately enough for the Roman shade to follow it.
That difference may sound small, but it changes the way I approach the entire measuring process.
For specialty-shaped windows, I think of the measurements less as a set of dimensions and more as a way of describing a profile.
Inside Mount or Outside Mount?
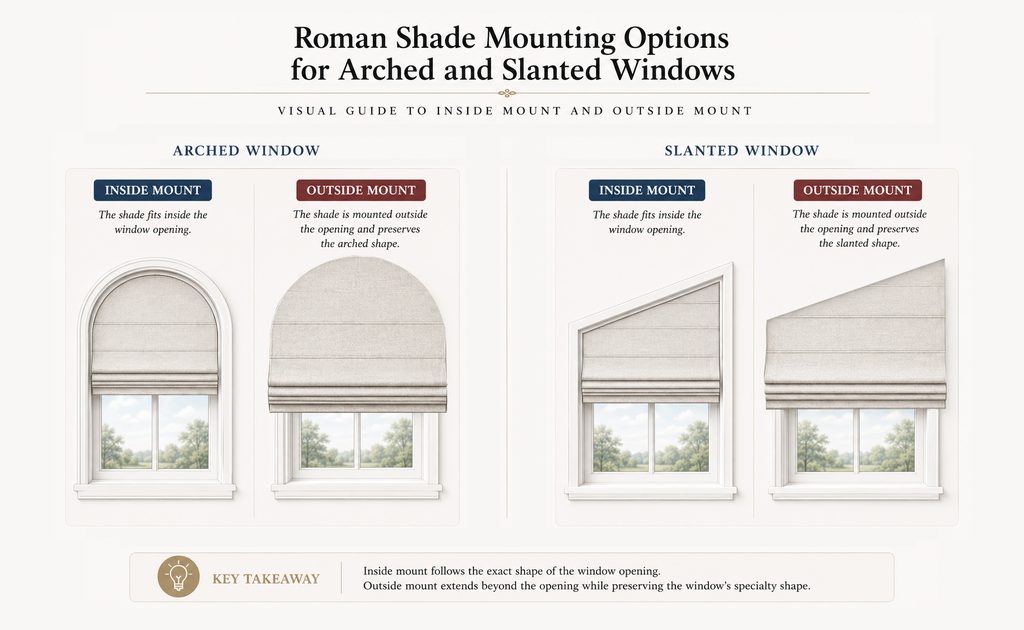
Before taking detailed measurements, first decide how the Roman shade will be mounted.
An inside mount follows the actual shape of the window opening. The finished shade needs to fit within that opening, so the measurements must reflect the real dimensions and any irregularities in the frame.
An outside mount gives more flexibility. The shade is installed beyond the window opening and can extend onto the trim or surrounding wall.
For arched and slanted windows, an outside mount can still preserve the specialty-shaped top rather than turning the treatment into a simple rectangle.
That distinction is important.
If the outside-mounted shade is designed as a standard rectangular shade, the measuring process is much simpler and follows the same general principles as a regular outside-mount Roman shade. In this article, I am focusing on outside mounts that preserve the arched or slanted profile.
Measuring an Arched Window for an Inside Mount
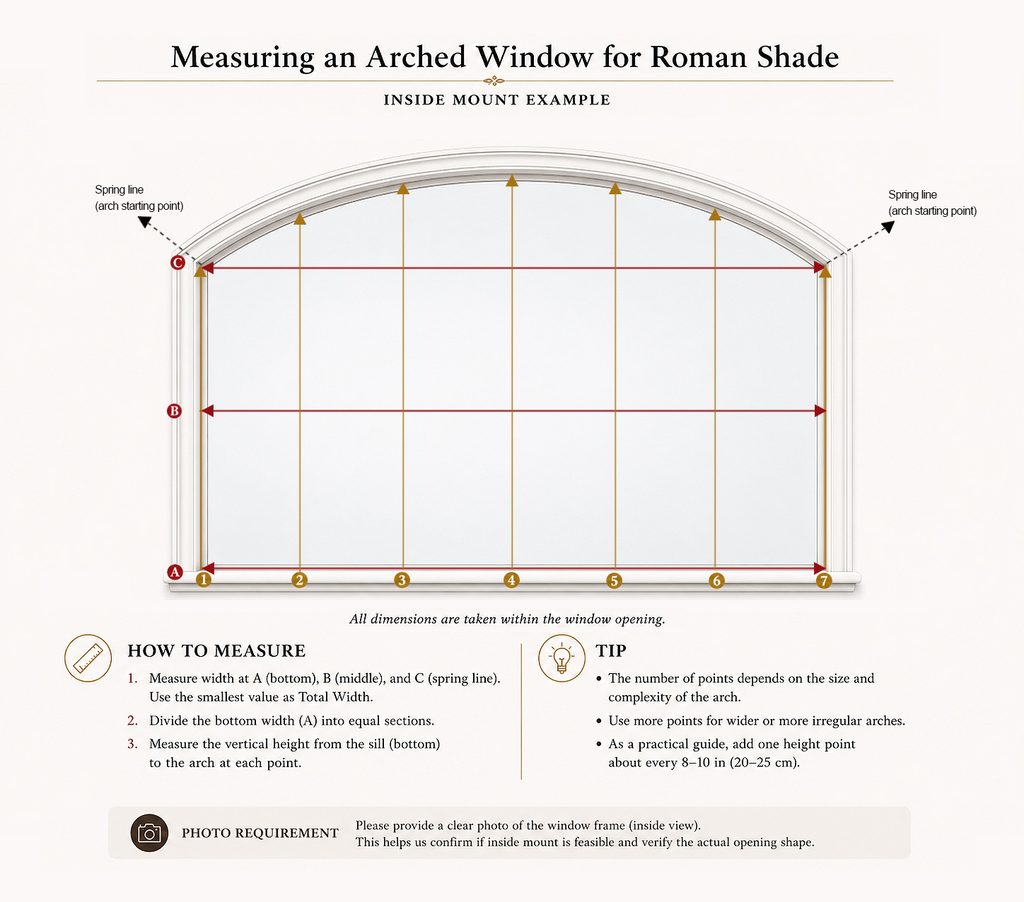
An arch is a curve, so a single height measurement cannot describe it accurately.
The most useful way to think about an arched opening is to record a series of vertical heights across the window. Together, those points describe the shape of the arch.
Before doing that, I also like to check the width at several heights. Even when a window looks symmetrical, the actual opening may not be perfectly consistent from bottom to top.
The spring line, where the straight sides transition into the arch, is an especially useful reference point because it helps define where the curve begins.
The number of height points does not have to be the same for every window. A smaller, regular arch may need fewer points, while a wider or less consistent arch benefits from additional measurements.
The important thing is not the number itself. It is whether the points describe the curve clearly enough.
I usually think of it this way:
The goal is not simply to record the highest point of the arch. The goal is to capture the shape of the curve.
Measuring a Slanted Window for an Inside Mount
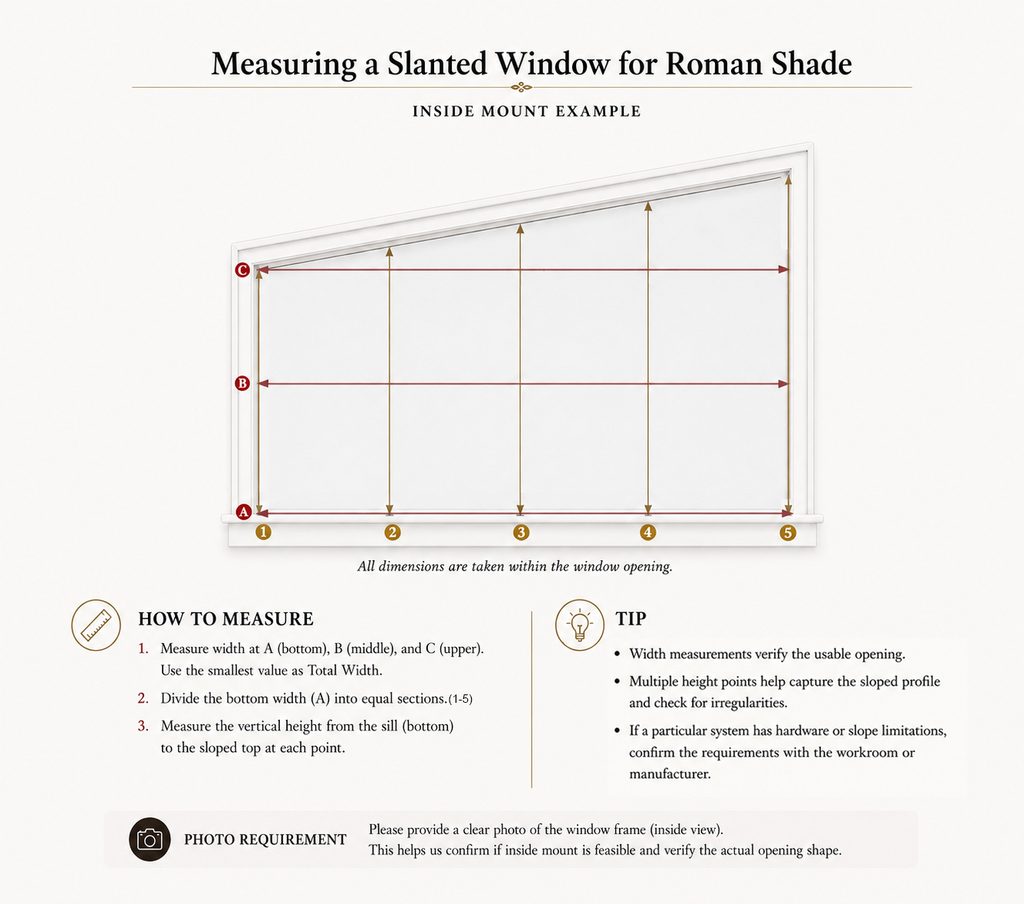
A slanted window is geometrically simpler than an arch because the upper edge is usually a straight line.
Still, for an inside mount, I prefer not to rely only on the low-side and high-side heights.
Real window openings are not always perfectly square, and construction tolerances can create small differences that are hard to see until the shade is installed.
Taking several width measurements helps confirm the usable opening, while multiple vertical height points help verify that the sloped edge is actually as straight and consistent as it appears.
For a clean, regular opening, these measurements may feel slightly repetitive. But with inside mounts, that extra checking is often worthwhile because there is much less room for adjustment once the shade is fabricated.
If a particular Roman shade system has hardware or slope limitations, those requirements should also be confirmed with the workroom or manufacturer before ordering.
Measuring an Arched Window for an Outside Mount
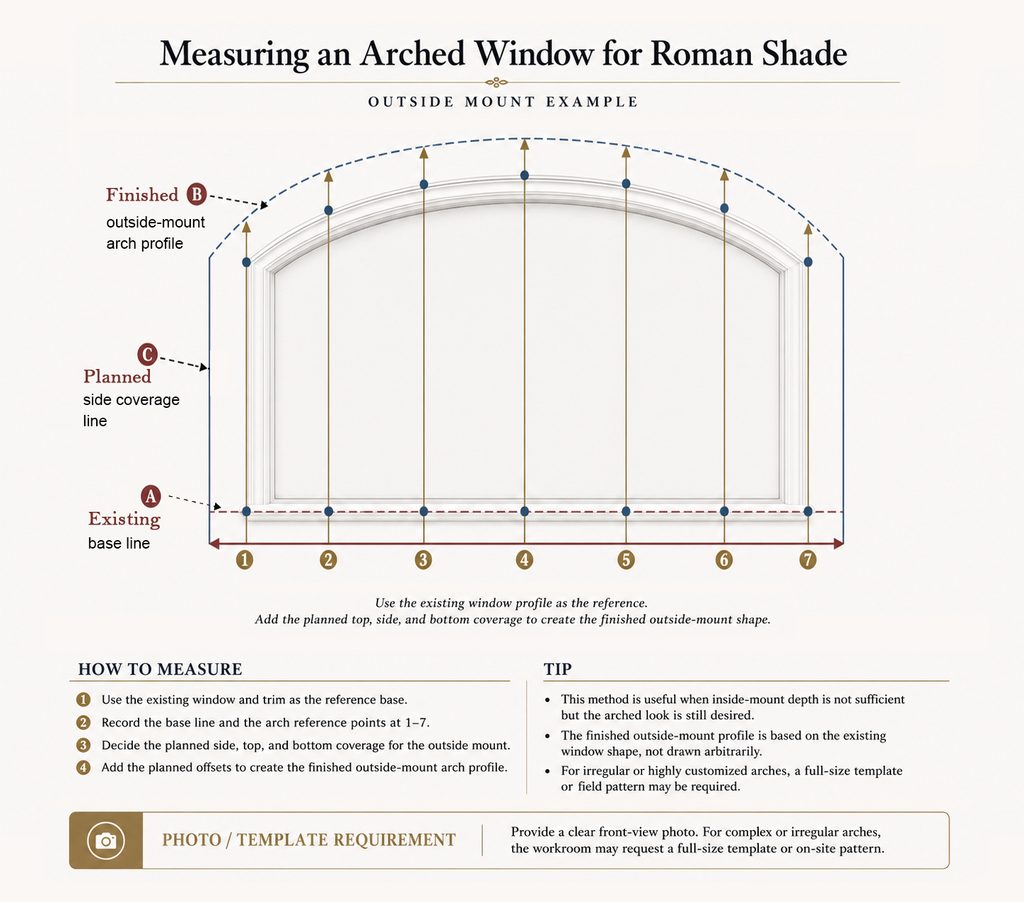
Outside mounting an arched Roman shade becomes more interesting when the goal is to preserve the arch rather than cover it with a rectangular shade.
In that situation, I would not treat the finished arch as a completely new shape.
A more practical approach is to use the existing window profile as the reference, then build the finished outside-mount profile from it.
First, document the original arch. Then decide how much additional coverage is needed at the sides, top, and bottom. Those planned offsets become the basis for the finished shade profile.
This keeps the outside-mounted shade visually related to the architecture of the window instead of creating an arbitrary curve.
I find this especially useful when an inside mount is not possible because the window does not have enough mounting depth, but the client still wants to preserve the arched character of the opening.
This is not the only way a workroom may approach an outside-mounted arch, but it is a practical way to organize the measurements and communicate the intended finished shape.
Measuring a Slanted Window for an Outside Mount
A regular slanted window is usually easier.
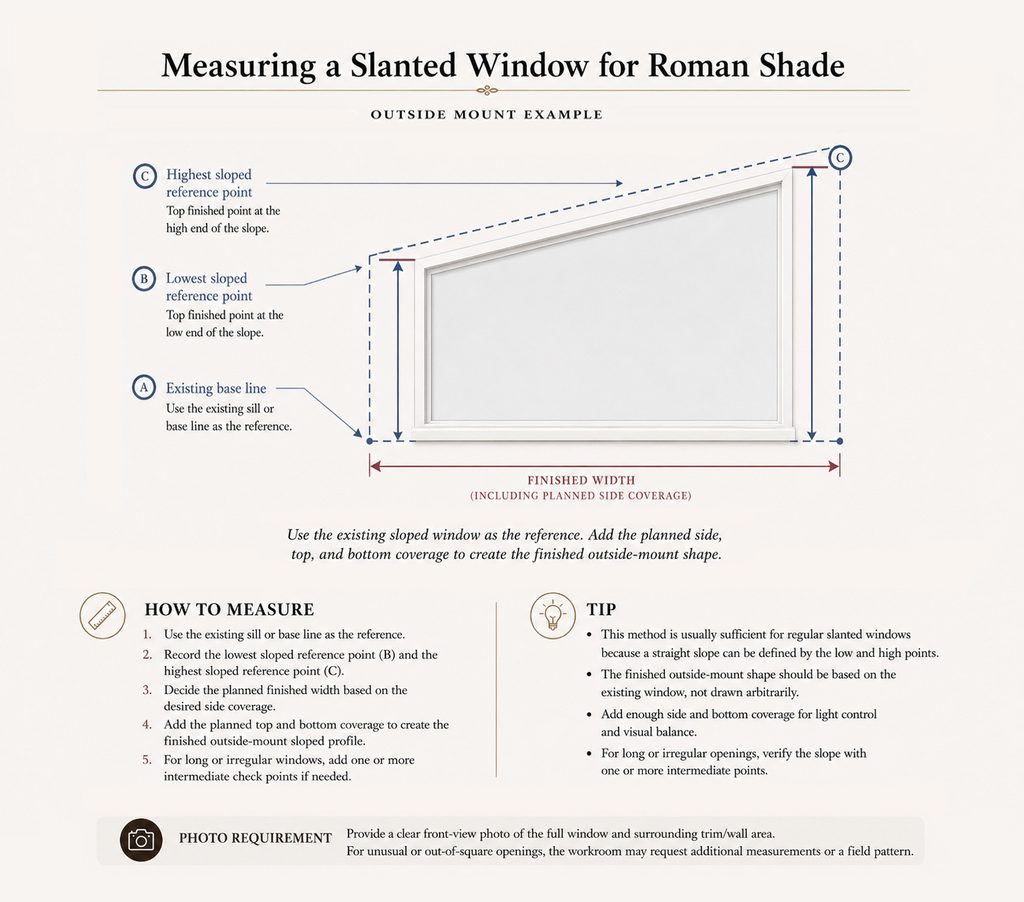
Because the sloped top is a straight line, the low and high reference points can define the direction of the finished slope.
From there, the finished width and the planned side, top, and bottom coverage can be established around the existing window.
For many regular slanted windows, there is no need to create the same number of intermediate points used for an inside mount.
However, if the window is very wide, visibly irregular, or slightly out of square, adding one or more intermediate check points is a simple way to confirm that the assumed straight line really matches the opening.
When Measurements May Not Be Enough
Multi-point measurements work well for many arched and slanted windows, but they do have limits.
Some openings are simply too irregular to describe confidently with dimensions alone.
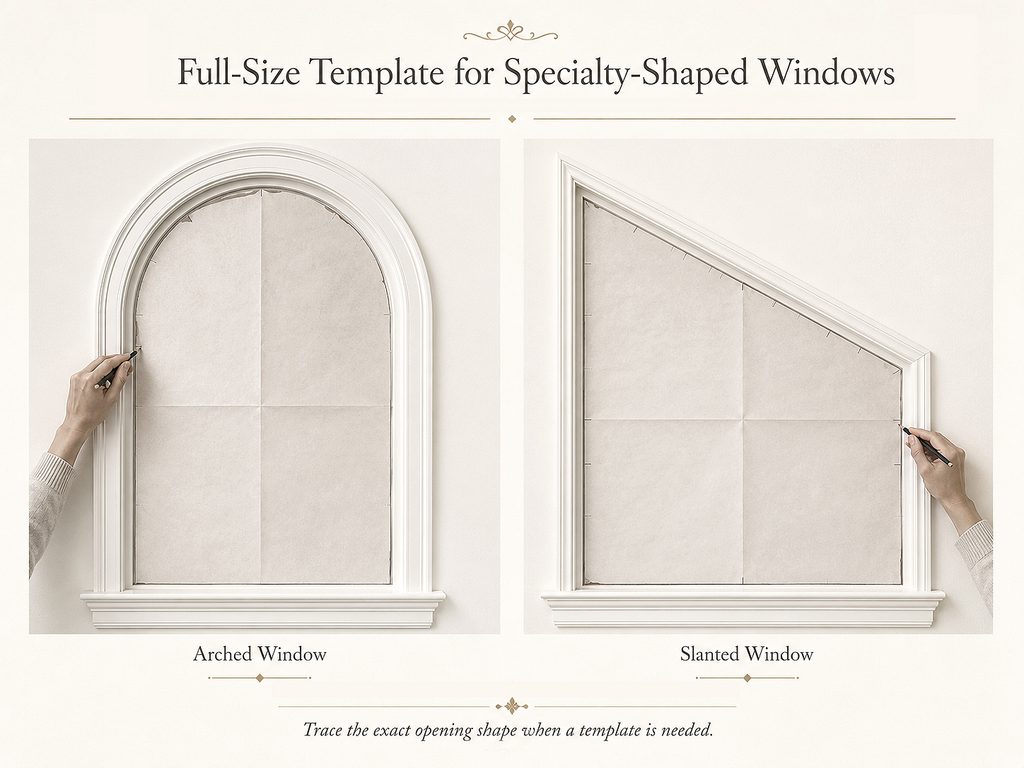
This is where a full-size template becomes useful.
A template can physically capture the actual shape of the opening, including small asymmetries, uneven construction, or unusual trim conditions that may not be obvious from a measurement sheet.
A workroom may request a template or on-site pattern for situations such as:
- irregular or asymmetrical arches;
- older window openings;
- complex trim or molding;
- very large specialty-shaped windows;
- unusually tight fitting requirements.
For inside mounts, the template generally follows the actual opening.
For shaped outside mounts, the existing opening can still serve as the reference, with the desired overlap added to establish the finished profile.
When the shape is complicated enough that the measurements begin to feel uncertain, I think that is usually a sign to stop adding more numbers and consider a template instead.
A Few Practical Notes
Specialty-shaped windows are one of those areas where photographs are almost as useful as dimensions.
A clear front-view photo helps the workroom understand the overall shape, while a side or close-up photo can reveal mounting depth, trim details, handles, or other conditions that may affect the finished treatment.
It is also worth remembering that different Roman shade systems may have different fabrication and hardware requirements. A measurement method can describe the window accurately, but the final feasibility still depends on the construction of the shade itself.
For that reason, I prefer to treat these measurements as part of a conversation between the site, the designer, and the workroom—not simply as numbers entered on an order form.
Final Thoughts
Arched and slanted windows look complicated at first, but the underlying idea is fairly simple:
Measure the shape, not just the width and height.
For an inside mount, that means documenting the actual opening as accurately as possible.
For a shaped outside mount, it means using the existing window as a reference and building the finished profile around it.
And when the shape becomes too irregular for measurements to describe with confidence, a full-size template may be the better tool.
The goal is not to collect as many dimensions as possible.
It is to collect the right information so the finished Roman shade relates naturally to the architecture of the window.
Related Notes
Measuring Basics for Custom Drapery and Roman Shades
A foundation for understanding area to cover, finished size, inside and outside mounts, hardware, installation conditions, and the measuring logic behind custom window treatments.
How to Measure for Roman Shades
A practical guide to measuring standard Roman shade applications, including inside and outside mounts, finished dimensions, mounting conditions, and site considerations.
How to Measure Arched and Slanted Windows for Drapery
A companion guide to measuring arched and slanted windows for drapery, showing how the same unusual window geometry requires a different measuring approach when the finished treatment changes.
Understanding Roman Shades: A Complete Guide to Styles, Construction, Operation, and Details
A broader reference for understanding how Roman shade appearance, construction, operation, and fabrication details work together in the finished treatment.