
In custom Roman shade making, fabric seams can have a significant impact on the finished appearance. Unlike pleated draperies, a Roman shade presents a relatively flat face when it is lowered. There are no deep pleats or vertical folds to help hide a seam. For this reason, when a Roman shade becomes wider than the fabric width, the question is not only how to seam the fabric, but whether the shade should remain one large shade at all.
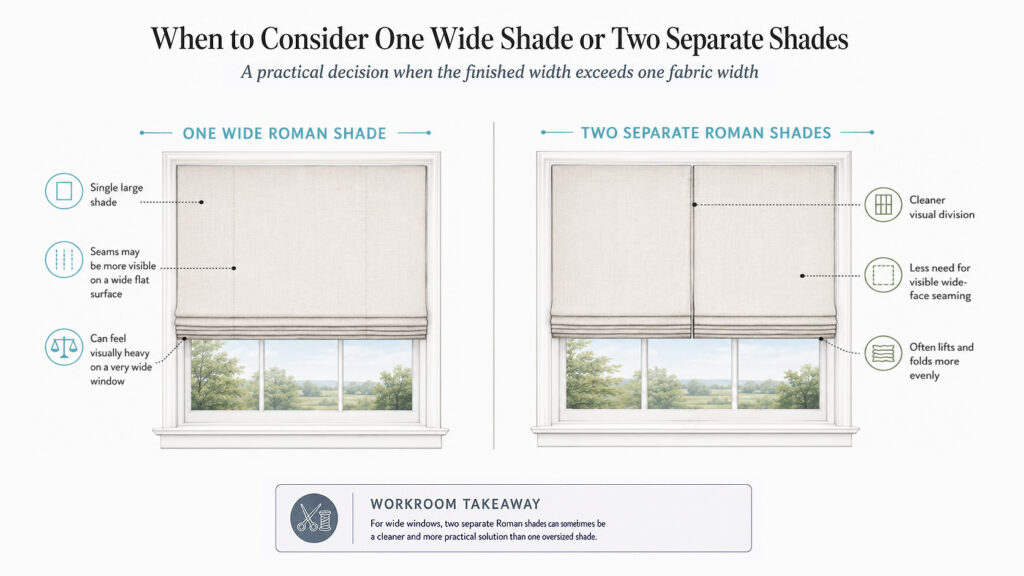
When the finished width exceeds one fabric width, the first step is to consider whether there is a better solution before deciding on seam placement. In some cases, a wider fabric may be available. In others, a railroaded fabric may be suitable, depending on the fabric direction, pattern, texture, and intended appearance. The window structure itself should also be considered. A wide window with a center mullion or clear divisions may be better suited to two separate Roman shades rather than one very wide shade.
For wider windows, dividing the treatment into two Roman shades can often be a cleaner and more practical solution. It can reduce the need for visible seams across a large flat surface. It may also help the shades lift more evenly, fold more neatly, and function more smoothly over time. In many cases, the issue is not simply whether the seam can be handled well, but whether one oversized Roman shade is the best design choice.
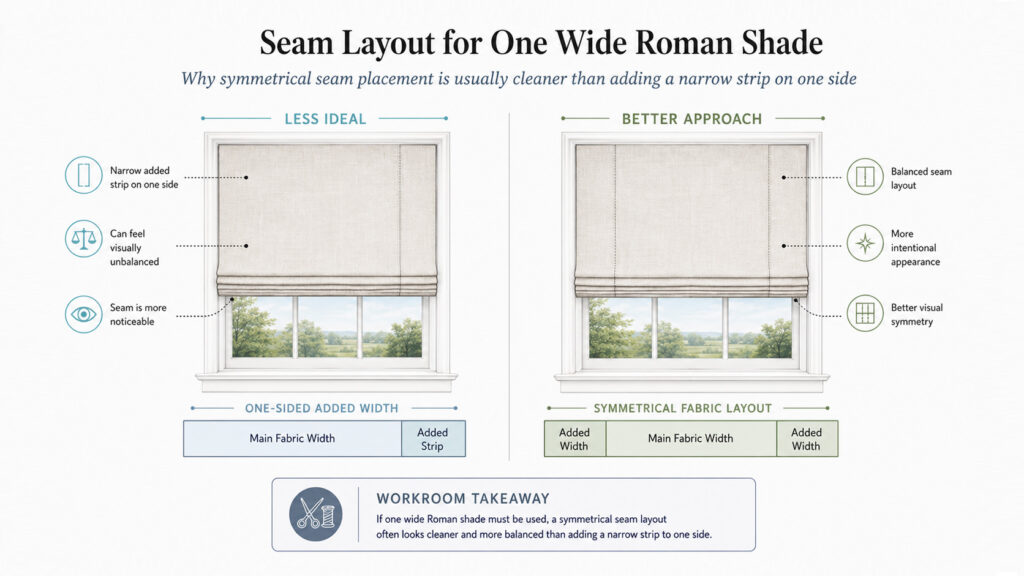
If the design requires one wide Roman shade, seam placement needs to be planned carefully. Because the face of a Roman shade reads more like a single flat panel, a seam that falls randomly can become very noticeable. Adding a narrow strip of fabric to one side is usually not ideal, especially if it makes the shade look visually unbalanced or creates the impression that the fabric was simply extended to meet the required width.
For one wide Roman shade, symmetrical seam placement is often a cleaner solution. For example, the main fabric width may be placed in the center, with added fabric widths distributed evenly on both sides. Depending on the fabric width, pattern direction, and finished shade size, the widths can be adjusted so the face of the shade remains visually balanced. Even when seams are present, a symmetrical layout often looks more intentional and refined than a narrow added strip on one side.
For solid or textured fabrics, symmetry helps avoid visual weight on one side of the shade. For stripes, checks, geometric patterns, jacquards, or large-scale motifs, seam placement becomes even more important. Since the face of a Roman shade is flat and visible, pattern matching and visual rhythm need to be considered before cutting. A poorly placed seam can interrupt the design more obviously on a Roman shade than on a pleated drapery.
Another common situation occurs when the shade is only slightly wider than one fabric width. In this case, it may be tempting to add only a small strip of fabric to one side. However, this can make the shade look uneven or patched. A better approach is to redistribute the main and added fabric widths, or use small symmetrical additions on both sides, so the seam placement feels balanced within the finished face.
Fabric seaming in Roman shades is not only a sewing decision. It is both a design and workroom decision. It should take into account the finished width, fabric width, window structure, pattern direction, pattern matching, lifting performance, fold behavior, and final face appearance. Good seam planning does not always make the seam disappear, but it allows the seam to feel quiet, balanced, and intentional.
Workroom Note:
When a Roman shade exceeds the fabric width, first consider whether the treatment should be divided into two separate shades. If one wide shade is required, avoid placing a seam randomly on one side or in a visually dominant area. A symmetrical seam layout is often the cleaner choice, especially when planned together with the fabric pattern, finished width, and folding structure.
Related Notes
Understanding Roman Shades: A Complete Guide to Styles, Construction, Operation, and Details
A broader guide to Roman shade construction, operation, appearance, and fabrication details, providing context for how fabric and construction decisions work together in the finished treatment.
Roman Shade Returns: A Small Side Detail That Changes the Finished Look
A closer look at another small but important Roman shade detail, exploring how returns affect the side profile, coverage, and overall finished appearance.
How Fabric Texture Changes the Look of Window Treatments
A study of how fabric texture, weight, softness, and surface character influence drape and the finished appearance of a window treatment.
How to Measure for Roman Shades
A practical guide to measuring Roman shades, including width, height, inside and outside mounts, mounting depth, trim, obstructions, and final ordering checks.